智谱网络搜索赋能AI语音,实现实时智能新闻播报

答疑vx群:adoresever

# AutoGen Hotspot Project

本项目利用微软 AutoGen 框架,构建一个用于分析和响应热点问题的多智能体(Multi-Agent)AI 系统。系统集成了语音合成(TTS)功能。
## 1. 先决条件 (Prerequisites)
在开始之前,请确保您的系统满足以下条件:

– **操作系统**: 一个基于 Linux 的操作系统(本项目在 Ubuntu 上开发和测试)。
– **Conda**: 已安装 Miniconda 或 Anaconda。推荐使用 [Miniconda](https://docs.conda.io/projects/miniconda/en/latest/),因为它更轻量。
– **Git**: 用于克隆本代码仓库。

## 2. 安装与配置 (Installation & Configuration)

我们提供了一个自动化的安装脚本 `setup.sh`,它将为您处理所有复杂的环境配置。请严格按照以下步骤操作。

### 步骤一:克隆代码仓库
cd autogen_hotspot_project
步骤二:运行自动化安装脚本
这是最关键的一步。 请先确保您处于 Conda 的 (base) 环境下(如果不是,请运行 conda deactivate 直到回到 base)。
然后,为脚本赋予执行权限并运行它:
chmod +x setup.sh
./setup.sh
该脚本会自动完成以下所有工作:
检查并清理任何旧的 autogen_env 环境。
创建一个全新的、纯净的 Conda 环境。
使用 conda-forge 频道安装所有核心的、复杂的依赖,从根本上保证环境的稳定性。
使用 pip 补全剩余的 Python 包。
脚本执行成功后,您将看到环境配置完毕的提示。
步骤三:配置环境变量
本项目需要使用 API 密钥和其他配置项。
复制环境变量示例文件:
cp .env.example .env
编辑新建的 .env 文件,填入您自己的密钥和配置信息。例如:
# .env 文件示例
DASHSCOPE_API_KEY=”sk-xxxxxxxxxxxxxxxxxxxxxxxx”
ZHIPU_API_KEY=”zz-xxxxxxxxxxxxxxxxxxxxxxxx”
OPENAI_API_KEY=”sk-xxxxxxxxxxxxxxxxxxxxxxxx”
OPENAI_API_BASE=”https://api.openai.com/v1″
3. 运行项目 (Running the Application)
所有配置完成后,按以下步骤启动程序:
激活 Conda 环境 (每次开启新的终端都需要执行此步骤):
conda activate autogen_env
运行主程序:
python main.py
程序启动后,您将看到提示 💭 您好!请输入您想了解的热点问题:,此时项目已成功运行。
4. 项目结构 (Project Structure)
.
├── agents/ # 存放所有 Agent 的定义文件
├── tools/ # 存放所有工具函数(搜索、语音、文件)
├── output/ # ❗ 自动生成:用于存放输出的报告和语音文件
│ ├── audio/ # -> 存放 .wav 语音文件
│ └── *.txt # -> 存放 .txt 文本报告
├── main.py # ✅ 项目主入口文件,负责编排整个流程
├── setup.sh # ✅ 推荐的一键安装脚本
├── README.md # 📖 本说明文档
├── requirements.txt # 📄 【参考】项目依赖列表,主要由 setup.sh 在内部使用
└── .env.example # 🔑 【重要】环境变量示例文件,请复制为 .env 并修改
5. 故障排除 (Troubleshooting)
问题: 运行 ./setup.sh 或其他 Conda 命令时出现 CondaHTTPError: HTTP 000 CONNECTION FAILED 错误。
原因: 这是网络问题,连接 Conda 官方服务器超时或失败。
解决方案: 更换为国内镜像源(如清华大学源),可以大幅提升下载速度和稳定性。
# 配置 Conda 镜像源
conda config –add channels https://mirrors.tuna.tsinghua.edu.cn/anaconda/cloud/conda-forge/
conda config –add channels https://mirrors.tuna.tsinghua.edu.cn/anaconda/pkgs/main/
conda config –set show_channel_urls yes

.env

# Qwen API 配置
# 获取方式:https://dashscope.console.aliyun.com/

BASE_URL="https://dashscope.aliyuncs.com/compatible-mode/v1"
MODEL="qwen-plus" 
QWEN_API_KEY=

# 智谱 API 配置  
# 获取方式:https://open.bigmodel.cn/
ZHIPU_API_KEY=
DASHSCOPE_API_KEY=

# 搜索结果数量(默认5)
SEARCH_TOP_K=5

# 调试模式(默认True)
DEBUG_MODE=True

requirements.txt

# 配置完成后,重新运行安装脚本 ./setup.sh

# AutoGen 框架的核心包
pyautogen

# 用于加载 .env 文件中的环境变量
python-dotenv>=1.0.0

# AutoGen的核心依赖,用于连接兼容接口
openai>=1.0.0

# 用于向智谱 API 发送 HTTP 请求
requests>=2.31.0

# 阿里云官方 SDK,用于文本转语音
dashscope

# 用于实时播放音频流的核心库
pyaudio

# 用于高效处理音频数据
numpy

setup.sh

#!/bin/bash
# ===================================================================
# AutoGen Hotspot Project - 自动化安装脚本
# 执行此脚本: ./setup.sh
# ===================================================================
# 如果任何命令失败,则立即退出脚本
set -e

# 定义环境名称
ENV_NAME="autogen_env"

echo "--> 第 1 步:清理旧环境(如果存在)..."
# 检查环境是否存在,如果存在则删除
if conda info --envs | grep -q "^$ENV_NAME\s"; then
    echo "发现旧环境 '$ENV_NAME',正在删除..."
    conda env remove --name $ENV_NAME --yes
    echo "旧环境删除完毕。"
else
    echo "未发现旧环境,跳过清理。"
fi

echo "--> 第 2 步:创建一个纯净的 Python 3.10 环境..."
conda create --name $ENV_NAME python=3.10 --yes

echo "--> 第 3 步:激活环境并执行使用 conda-forge 安装核心依赖..."
# conda run 会在指定的 conda 环境中执行命令
conda run -n $ENV_NAME conda install -c conda-forge pyautogen python-dotenv requests openai pyaudio numpy --yes

echo "--> 第 4 步:使用 pip 安装剩余的补充依赖..."
conda run -n $ENV_NAME pip install dashscope

echo ""
echo "====================================================="
echo " ✅ 环境 '$ENV_NAME' 已成功创建并配置完毕!"
echo ""
echo "请手动激活环境以开始使用:"
echo "conda activate $ENV_NAME"
echo "====================================================="

main.py

# main.py 

import os
import autogen
import dotenv
from datetime import datetime
import logging

# --- 基础配置 ---
# 抑制 FLAML 和 AutoGen 的一些冗余日志输出,让终端更干净
logging.getLogger("flaml").setLevel(logging.ERROR)
logging.getLogger("autogen.oai.client").setLevel(logging.ERROR)
dotenv.load_dotenv()

# --- 导入 Agent 和工具 ---
from agents.user_proxy import create_user_proxy
from agents.query_analyst import create_query_analyst
from agents.info_synthesizer import create_info_synthesizer
from agents.report_generator import create_report_generator
from agents.announcer import create_announcer

from tools.search_tool import zhipu_web_search
from tools.file_tool import save_report_to_file
from tools.speaker_tool import text_to_speech

# --- 加载 LLM 配置 ---
QWEN_API_KEY = os.getenv("QWEN_API_KEY")
BASE_URL = os.getenv("BASE_URL")
MODEL = os.getenv("MODEL")

if not QWEN_API_KEY:
    raise ValueError("错误: 未在 .env 文件中找到 QWEN_API_KEY")

# 共享的 LLM 配置
llm_config = {
    "config_list": [{"model": MODEL, "api_key": QWEN_API_KEY, "base_url": BASE_URL}],
    "temperature": 0.2
}

# ========== 主程序入口 ==========
if __name__ == "__main__":
    initial_question = input("💭 您好!请输入您想了解的热点问题: ")
    if not initial_question.strip():
        print("错误:输入不能为空。")
        exit()

    print("\n" + "="*20 + " 流程启动 " + "="*20)

    # ======================================================================================
    # 阶段一:意图分析 (单 Agent 对话,获取清晰的任务描述)
    # ======================================================================================
    print("\n> [阶段一] 正在分析您的问题意图...")

    # 1. 创建此阶段专用的 Agent
    #    - User Proxy 作为一个简单的任务发起者
    #    - Query Analyst (新版) 负责分析问题
    analysis_user_proxy = autogen.UserProxyAgent(
        name="Analysis_Task_Initiator",
        human_input_mode="NEVER",
        max_consecutive_auto_reply=2, # 只需要一轮对话
        code_execution_config=False, # 此阶段不需要执行代码
        is_termination_msg=lambda x: True # Analyst 回复后立即终止
    )
    query_analyst = create_query_analyst(llm_config)

    # 2. 发起一次性的对话来获取分析结果
    analysis_user_proxy.initiate_chat(
        query_analyst,
        message=initial_question,
    )

    # 3. 从对话历史中提取出分析师的最终结论
    analyzed_task_description = analysis_user_proxy.last_message()["content"]
    print(f"> [分析完成] 明确的任务目标是: '{analyzed_task_description}'")


    # ======================================================================================
    # 阶段二:工具执行 (由确定性的 Python 代码完成)
    # ======================================================================================
    print(f"\n> [阶段二] 正在围绕任务目标执行网络搜索...")
    
    # 直接调用工具函数,传入分析后的、高质量的任务描述
    search_results = zhipu_web_search(query=analyzed_task_description)
    print(f"> [搜索完成] 已获取相关资料。")


    # ======================================================================================
    # 阶段三:内容生成 (GroupChat 负责文本创作)
    # ======================================================================================
    print(f"\n> [阶段三] 启动 AI 团队进行报告生成...")

    # 1. 定义好所有在 GroupChat 中需要被执行的工具
    #    未来如果有更多工具,也添加到这个字典里
    tools_for_groupchat = {
        "text_to_speech": text_to_speech
        # 如果 announcer 还需要其他工具,也在这里添加
    }

    # 2. 创建此阶段需要的 Agent,并在创建 User_Proxy 时直接注入工具
    user_proxy = create_user_proxy(function_map=tools_for_groupchat) # <-- 关键改动在这里
    info_synthesizer = create_info_synthesizer(llm_config)
    report_generator = create_report_generator(llm_config)
    announcer = create_announcer(llm_config)

    # 3. 定义 GroupChat 和 Manager (这部分不变)
    groupchat = autogen.GroupChat(
        agents=[user_proxy, info_synthesizer, report_generator, announcer],
        messages=[],
        max_round=10,
        speaker_selection_method=lambda last_speaker, groupchat:
            announcer if groupchat.messages[-1].get("role") == "tool" else
            info_synthesizer if last_speaker is user_proxy else
            report_generator if last_speaker is info_synthesizer else
            announcer if last_speaker is report_generator else
            user_proxy
    )
    manager = autogen.GroupChatManager(groupchat=groupchat, llm_config=llm_config)

    # 4. 构造启动消息 (这部分不变)
    initial_message_for_groupchat = f"""
    用户的原始问题是:"{initial_question}"
    经过分析,我们明确了核心任务是:"{analyzed_task_description}"

    为了完成这个任务,我已经执行了网络搜索,相关资料如下:
    --- 搜索结果 ---
    {search_results}
    --- 搜索结果结束 ---

    现在,请团队开始工作,基于以上资料完成最终的报告。
    """

    # 5. 启动 AI 团队的对话协作 (这部分不变)
    user_proxy.initiate_chat(
        manager,
        message=initial_message_for_groupchat,
    )


    # ======================================================================================
    # 阶段四:后处理 
    # ======================================================================================
    print("\n" + "="*20 + " AI协作完成,开始执行最终任务 " + "="*20)

    final_report_content = None
    # 遍历所有消息,找到 Report_Generator 的发言
    all_messages = user_proxy.chat_messages[manager]
    for msg in all_messages:
        if msg.get("name") == "Report_Generator":
            final_report_content = msg["content"]
            break

    if final_report_content:
        print("\n> [后处理] 已成功从对话历史中提取最终报告。")

        # 执行保存
        save_status = save_report_to_file(final_report_content, initial_question)
        print(f"> {save_status}")

    else:
        print("\n> [警告] 未能在对话历史中找到报告内容,文件未保存,语音未播报。")

    print("\n🎉 " + "="*20 + " 所有任务已成功完成! " + "="*20 + " 🎉")

agents/announcer.py

import autogen

def create_announcer(llm_config):
    return autogen.AssistantAgent(
        name="Announcer",
        system_message="""你是一个专业的播音员。你的唯一任务是:
1. 接收`Report_Generator`生成的最终报告文本。
2. **必须**调用`text_to_speech`工具,并将**完整的报告文本**作为`content`参数传递给它。
3. 在你确认工具调用已发出后,你**必须在最后、且只说 'TERMINATE'** 来结束整个流程。""",
        llm_config={
            "config_list": llm_config["config_list"], "temperature": 0,
            "tools": [{
                "type": "function",
                "function": {
                    "name": "text_to_speech",
                    "description": "将最终的报告文本内容转换为语音并实时播放。",
                    "parameters": {
                        "type": "object", "properties": {
                            "content": {"type": "string", "description": "需要朗读的完整报告文本。"}
                        }, "required": ["content"]},
                }
            }],
            "tool_choice": "auto"
        }
    )

agents/info_synthesizer.py

import autogen

def create_info_synthesizer(llm_config):
    return autogen.AssistantAgent(
        name="Info_Synthesizer",
        system_message="""你是一个信息整合师。你的任务是接收`zhipu_web_search`工具返回的原始搜索结果。
你必须对这些信息进行分析、去重和筛选,提炼出最核心、最相关的内容,并形成一个结构化的要点列表。""",
        llm_config=llm_config
    )

agents/query_analyst.py

# agents/query_analyst.py (终极时效性版)

import autogen
from datetime import datetime

def create_query_analyst(llm_config):
    """
    创建一个 Query_Analyst Agent。
    ... (文档字符串不变) ...
    """
    
    current_date_str = datetime.now().strftime('%Y年%m月%d日')

    return autogen.AssistantAgent(
        name="Query_Analyst",
        system_message=f"""你是高级任务规划专家,今天是 {current_date_str}。
你的核心使命是确保所有信息都具备最高的时效性。

你的唯一职责是分析用户的原始问题,并遵循以下严格的逻辑树来生成最终的任务描述:

**1. 分析用户的输入中是否包含“近期”、“本周”、“本月”或类似的、指代一段时间的词语。**

   **A) 如果是(例如,用户问“近期AI热点”):**
      - 你的任务描述必须明确限定时间范围为“过去一个月内”。
      - **你的输出格式必须是**: "搜索并总结过去一个月内关于 [用户主题] 的热点新闻和进展。"
      - 示例: "搜索并总结过去一个月内关于AI领域的热点新闻和进展。"

   **B) 如果否(默认情况,例如,用户问“今日热点”或“AI”):**
      - 你的任务描述必须严格限定在“今天”,也就是“{current_date_str}”。
      - **你的输出格式必须是**: "搜索并总结 {current_date_str} 关于 [用户主题] 的热点新闻。"
      - 示例1 (用户问“今日热点”): "搜索并总结 {current_date_str} 的科技、财经和国际头条新闻。"
      - 示例2 (用户问“AI”): "搜索并总结 {current_date_str} 关于AI领域的热点新闻。"

**你的最终输出,只能是根据上述逻辑生成的、格式完全匹配的任务描述字符串,绝对不能包含任何其他解释、问候或对话。**""",
        
        llm_config=llm_config
    )

agents/report_generator.py

import autogen
from datetime import datetime

def create_report_generator(llm_config):
    return autogen.AssistantAgent(
        name="Report_Generator",
        system_message=f"""你是一个报告生成专家。今天是 {datetime.now().strftime('%Y年%m月%d日')}。
你的任务是接收`信息整合师`提供的要点列表,并将这些要点撰写成一篇通顺、易读的最终报告。
你的任务仅限于生成报告文本本身。完成后,直接输出报告内容即可。""",
        llm_config=llm_config
    )

agents/user_proxy.py

# agents/user_proxy.py 

import autogen

def create_user_proxy(function_map=None):
    """
    创建一个 UserProxyAgent。

    这个新版本可以接收一个可选的 function_map 参数,
    以便在创建时就为其注册所有需要的工具函数。
    """
    return autogen.UserProxyAgent(
        name="User_Proxy_For_Initiating_Chat",
        human_input_mode="NEVER",
        max_consecutive_auto_reply=15, 
        is_termination_msg=lambda x: "TERMINATE" in x.get("content", "").upper(),
        code_execution_config={"work_dir": "temp_code_execution", "use_docker": False},
        # 在这里,我们将 function_map 直接传递给 agent 的构造函数
        function_map=function_map
    )

tools/file_tool.py

# tools/file_tool.py 
import os
from datetime import datetime

def save_report_to_file(content: str, topic: str) -> str:
    print(f"\n> [工具执行] 正在保存报告...")
    try:
        os.makedirs("output", exist_ok=True)
        safe_topic = "".join(c for c in topic if c.isalnum())[:20] 
        filename = f"output/{safe_topic}_report_{datetime.now().strftime('%Y%m%d')}.txt"
        with open(filename, 'w', encoding='utf-8') as f:
            f.write(content)
        return f"报告已成功保存至 {filename}"
    except Exception as e:
        return f"保存文件出错: {e}"

tools/search_tool.py

# tools/search_tool.py

import os
import requests

# 这个工具需要智谱的API Key
ZHIPU_API_KEY = os.getenv("ZHIPU_API_KEY")

def zhipu_web_search(query: str) -> str:
    """一个调用智谱Web Search API的工具。"""
    if not ZHIPU_API_KEY:
        return "错误:未在 .env 文件中找到 ZHIPU_API_KEY"

    print(f"\n> [工具执行中] 正在使用智谱搜索: '{query}'")
    try:
        response = requests.post(
            "https://open.bigmodel.cn/api/paas/v4/web_search",
            headers={"Authorization": f"Bearer {ZHIPU_API_KEY}"},
            json={"search_query": query, "search_engine": "search_std"},
            timeout=30
        )
        response.raise_for_status()
        results = response.json().get("search_result", [])
        if not results:
            return "没有找到相关结果。"
        
        SEARCH_TOP_K = int(os.getenv("SEARCH_TOP_K", 5))
        return "\n\n".join([
            f"标题: {item.get('title', 'N/A')}\n"
            f"发布日期: {item.get('publish_date', 'N/A')}\n"
            f"摘要: {item.get('content', 'N/A')[:200]}...\n"
            f"链接: {item.get('link', 'N/A')}"
            for item in results[:SEARCH_TOP_K]
        ])
    except Exception as e:
        return f"搜索工具出错: {e}"

tools/speaker_tool.py

import os
import dashscope
import pyaudio
import base64
import re
from datetime import datetime

def text_to_speech(content: str, voice: str = "Ethan") -> str:
    api_key = os.getenv("DASHSCOPE_API_KEY")
    if not api_key:
        return "错误:未在 .env 文件中找到 DASHSCOPE_API_KEY。"
    
    p = pyaudio.PyAudio()
    stream = p.open(format=pyaudio.paInt16, channels=1, rate=24000, output=True)
    sentences = re.split(r'([。?!;.!?])', content)
    processed_sentences = [sentences[i] + (sentences[i+1] if i+1 < len(sentences) else '') for i in range(0, len(sentences), 2)]
    processed_sentences = [s.strip() for s in processed_sentences if s.strip()]
    full_audio_data = bytearray()
    
    print(f"\n> [工具执行中] 准备实时朗读报告...")
    try:
        print("> 正在合成并实时播放语音...")
        for i, sentence in enumerate(processed_sentences):
            if not sentence: continue
            response_generator = dashscope.audio.qwen_tts.SpeechSynthesizer.call(
                model="qwen-tts", text=sentence, api_key=api_key, voice=voice, stream=True
            )
            for chunk in response_generator:
                audio_data_b64 = chunk.get("output", {}).get("audio", {}).get("data")
                if audio_data_b64:
                    wav_bytes = base64.b64decode(audio_data_b64)
                    stream.write(wav_bytes)
                    full_audio_data.extend(wav_bytes)
            print(f"> ...已播放第 {i+1}/{len(processed_sentences)} 句...")
        stream.stop_stream()
        
        os.makedirs("output/audio", exist_ok=True)
        timestamp = datetime.now().strftime('%Y%m%d_%H%M%S')
        filepath = f"output/audio/report_{timestamp}.wav"
        with open(filepath, "wb") as f:
            f.write(full_audio_data)
        print(f"> 语音文件已成功保存至: {filepath}")
        
        return f"报告已朗读完毕,并已保存至 {filepath}"
    except Exception as e:
        import traceback
        traceback.print_exc()
        return f"文本转语音工具出错: {e}"
    finally:
        stream.close()
        p.terminate()

Crawl4ai (2025年6月16日视频)

可加V:adoresever

1. web_scrapping.py :
# ── requirements ─────────────────────────────────────────────────────────
# pip install crawl4ai openai pydantic python-dotenv
# playwright install
from typing import List, Optional
import os, json, asyncio
from pydantic import BaseModel, Field
from dotenv import load_dotenv
from crawl4ai import (
AsyncWebCrawler,
BrowserConfig,
CrawlerRunConfig,
CacheMode,
LLMConfig
)

from crawl4ai.extraction_strategy import LLMExtractionStrategy ##LLM策略


# ── 1. load keys ─────────────────────────────────────────────────────────
load_dotenv() # puts keys in env vars
URL_TO_SCRAPE = “https://en.wikipedia.org/wiki/British_Shorthair”

# ── 2. declare a schema that matches the *instruction* ───────────────────
class BritishShorthairInfo(BaseModel):
breed_name: str = Field(…, description=”The common name of the cat breed, e.g., ‘British Shorthair'”)
origin_country: str = Field(…, description=”The country of origin for the British Shorthair.”)
history_summary: str = Field(…, description=”A concise summary of the history of the British Shorthair.”)
key_characteristics: List[str] = Field(…, description=”A list of the main physical characteristics of the British Shorthair, such as body type, head shape, eyes, coat, and tail.”)
temperament: str = Field(…, description=”Typical temperament and personality traits of the British Shorthair.”)
common_colors: Optional[List[str]] = Field(None, description=”A list of common coat colors for the British Shorthair, e.g., ‘blue’, ‘cream’, ‘black’.”)
average_weight_kg: Optional[float] = Field(None, description=”The average weight of the British Shorthair in kilograms. If a range is provided, calculate the midpoint, otherwise null.”)
lifespan_years: Optional[str] = Field(None, description=”The average lifespan of the British Shorthair in years, retain original text format (e.g., ’12-15 years’).”)
health_issues: Optional[List[str]] = Field(None, description=”A list of known common health issues or predispositions for the British Shorthair.”)
care_and_maintenance: Optional[str] = Field(None, description=”Requirements for care and daily maintenance of the British Shorthair.”)
recognition: Optional[List[str]] = Field(None, description=”A list of cat associations or organizations that recognize the breed.”)

INSTRUCTION_TO_LLM = “””
You are provided with a Wikipedia page about the British Shorthair cat breed.
Your task is to extract detailed information about this cat.
For each field in the schema, extract the relevant information directly from the text.
– For `history_summary`, provide a concise summary of its main historical development.
– For `key_characteristics`, list the unique physical traits mentioned in the text (e.g., body, head, eyes, fur).
– For list fields (e.g., `common_colors`, `health_issues`, `recognition`), extract all relevant items mentioned.
– For numerical fields like `average_weight_kg` and `lifespan_years`, extract the precise numerical value or range. If weight is given as a range, provide the midpoint if possible, otherwise null. For lifespan, retain the original text format (e.g., “12-15 years”).
– If specific information is not explicitly found, set the corresponding field to `null`.
Return **only** valid JSON matching the schema – no additional text or markdown formatting.
“””


# ── 3. DeepSeek is OpenAI-compatible, so pass base_url + model name ──────
llm_cfg = LLMConfig(
provider=”deepseek/deepseek-chat”, # ✅ include model in the provider string
api_token=os.getenv(‘DEEPSEEK_API_KEY’),
# base_url=”https://api.deepseek.com/v1″
)

# ── 4. attach the extraction strategy ────────────────────────────────────
llm_strategy = LLMExtractionStrategy(
llm_config=llm_cfg,
schema=BritishShorthairInfo.model_json_schema(),
extraction_type=”schema”,
instruction=INSTRUCTION_TO_LLM,
chunk_token_threshold=1000,
apply_chunking=True, overlap_rate=0.0,
input_format=”markdown”,
)

crawl_cfg = CrawlerRunConfig(
extraction_strategy=llm_strategy,
cache_mode=CacheMode.DISABLED,
remove_overlay_elements=True,
exclude_external_links=True,
)

browser_cfg = BrowserConfig(headless=True, verbose=True, text_mode=True)

# ── 5. run the crawl ─────────────────────────────────────────────────────
async def main():
async with AsyncWebCrawler(config=browser_cfg) as crawler:
result = await crawler.arun(URL_TO_SCRAPE, config=crawl_cfg)

if result.success:
data = json.loads(result.extracted_content)
print(“✅ extracted”, len(data), “items”)
for p in data[:10]: print(p)
else:
print(“❌ error:”, result.error_message)
print(llm_strategy.show_usage()) # token cost insight


if __name__ == “__main__”:
asyncio.run(main())


2. craw+paper.py :
# ── requirements ─────────────────────────────────────────────────────────
# pip install crawl4ai openai pydantic python-dotenv litellm
# playwright install

import os, json, asyncio
from pydantic import BaseModel, Field
from typing import List, Optional
from dotenv import load_dotenv
from crawl4ai import (
AsyncWebCrawler,
BrowserConfig,
CrawlerRunConfig,
CacheMode,
LLMConfig
)
from crawl4ai.extraction_strategy import LLMExtractionStrategy

# Import litellm for direct LLM calls for our paper generation agent
import litellm
import subprocess
import tempfile
# ── 1. Load keys ─────────────────────────────────────────────────────────
load_dotenv()
# Make sure your DEEPSEEK_API_KEY is set in your .env file or environment variables
# For example, in .env: DEEPSEEK_API_KEY=”sk-YOUR_DEEPSEEK_KEY”
URL_TO_SCRAPE = “https://en.wikipedia.org/wiki/British_Shorthair”
OUTPUT_MD_FILENAME = “british_shorthair_paper_draft.md” # Markdown for better formatting
OUTPUT_JSON_FILENAME = “british_shorthair_info.json”
# ── 2. Declare schemas and instructions ──────────────────────────────────

# Schema for structured data extraction from Wikipedia
class BritishShorthairInfo(BaseModel):
breed_name: str = Field(…, description=”The common name of the cat breed, e.g., ‘British Shorthair'”)
# 将以下字段改为 Optional[str]
origin_country: Optional[str] = Field(None, description=”The country of origin for the British Shorthair.”)
history_summary: Optional[str] = Field(None, description=”A concise summary of the history of the British Shorthair.”)
key_characteristics: List[str] = Field(…, description=”A list of the main physical characteristics of the British Shorthair, such as body type, head shape, eyes, coat, and tail.”)
temperament: Optional[str] = Field(None, description=”Typical temperament and personality traits of the British Shorthair.”)
common_colors: Optional[List[str]] = Field(None, description=”A list of common coat colors for the British Shorthair, e.g., ‘blue’, ‘cream’, ‘black’.”)
average_weight_kg: Optional[float] = Field(None, description=”The average weight of the British Shorthair in kilograms. If a range is provided, calculate the midpoint, otherwise null.”)
lifespan_years: Optional[str] = Field(None, description=”The average lifespan of the British Shorthair in years, retain original text format (e.g., ’12-15 years’).”)
health_issues: Optional[List[str]] = Field(None, description=”A list of known common health issues or predispositions for the British Shorthair.”)
care_and_maintenance: Optional[str] = Field(None, description=”Requirements for care and daily maintenance of the British Shorthair.”)
recognition: Optional[List[str]] = Field(None, description=”A list of cat associations or organizations that recognize the breed.”)
# Instruction for the first agent (Crawl4AI LLMExtractionStrategy)

EXTRACTION_INSTRUCTION_TO_LLM = “””
You are provided with a Wikipedia page about the British Shorthair cat breed.
Your task is to extract detailed information about this cat.
For each field in the schema, extract the relevant information directly from the text.
– For `history_summary`, provide a concise summary of its main historical development.
– For `key_characteristics`, list the unique physical traits mentioned in the text (e.g., body, head, eyes, fur).
– For list fields (e.g., `common_colors`, `health_issues`, `recognition`), extract all relevant items mentioned.
– For numerical fields like `average_weight_kg` and `lifespan_years`, extract the precise numerical value or range. If weight is given as a range, provide the midpoint if possible, otherwise null. For lifespan, retain the original text format (e.g., “12-15 years”).
– If specific information is not explicitly found, set the corresponding field to `null`.
Return **only** valid JSON matching the schema – no additional text or markdown formatting.
“””

# Instruction for the second agent (Paper Draft Generation Agent)
# This mimics a basic academic paper structure.
# You can deeply customize this instruction to match your exact thesis format!
PAPER_DRAFT_INSTRUCTION = “””
You are an expert academic writer. Your task is to compile the provided structured information about the British Shorthair cat into a preliminary research paper draft.
The draft should follow a standard academic structure.

**Instructions for formatting:**
– Use Markdown for headings and formatting.
– Ensure logical flow and coherence between sections.
– For lists within sections (e.g., characteristics, colors, health issues), use bullet points.
– If a section’s information is ‘null’ or very brief, clearly state its absence or keep the section concise.

**Paper Structure:**

# Title: A Comprehensive Overview of the British Shorthair Cat Breed

## 1. Introduction
– Briefly introduce the British Shorthair breed, its origin, and its general popularity.

## 2. History and Development
– Detail the historical background of the breed using the `history_summary`.

## 3. Physical Characteristics
– Describe the key physical traits of the British Shorthair based on `key_characteristics`. Emphasize their distinctive appearance.
– Include information on common coat colors (`common_colors`).

## 4. Temperament and Personality
– Discuss the typical temperament and personality traits (`temperament`).

## 5. Health and Lifespan
– Outline common health issues (`health_issues`).
– Provide information on their average lifespan (`lifespan_years`).

## 6. Care and Maintenance
– Describe the general care and maintenance requirements (`care_and_maintenance`).

## 7. Breed Recognition
– List the associations or organizations that recognize the breed (`recognition`).

## 8. Conclusion
– Summarize the key aspects of the British Shorthair, reinforcing its unique appeal.

## References (Placeholder)
– [Further research needed]

**Provided Structured Data:**
“`json
{cat_info_json}
Based on the above structured data, generate the paper draft.
“””

# ── 3. Configure LLM for extraction ───────────────────────────────────────
llm_cfg_crawl4ai = LLMConfig(
provider=”deepseek/deepseek-chat”,
api_token=os.getenv(‘DEEPSEEK_API_KEY’),
# base_url=”https://api.deepseek.com/v1″ # Usually not needed if litellm knows the provider
)
DEEPSEEK_MODEL = “deepseek/deepseek-chat”
DEEPSEEK_API_KEY = os.getenv(‘DEEPSEEK_API_KEY’)
# Agent 1: Data Acquisition & Structuring Agent (using Crawl4AI)
async def acquire_and_structure_data(url: str) -> Optional[BritishShorthairInfo]:
print(“[AGENT 1: Data Acquisition] Starting web crawling and data extraction…”)
llm_strategy = LLMExtractionStrategy(
llm_config=llm_cfg_crawl4ai,
schema=BritishShorthairInfo.model_json_schema(),
extraction_type=”schema”,
instruction=EXTRACTION_INSTRUCTION_TO_LLM,
chunk_token_threshold=1000,
apply_chunking=True, overlap_rate=0.0,
input_format=”markdown”,
)
crawl_cfg = CrawlerRunConfig(
extraction_strategy=llm_strategy,
cache_mode=CacheMode.DISABLED,
remove_overlay_elements=True,
exclude_external_links=True,
)
browser_cfg = BrowserConfig(headless=True, verbose=True, text_mode=True)

async with AsyncWebCrawler(config=browser_cfg) as crawler:
result = await crawler.arun(url, config=crawl_cfg)

if result.success:
print(“✅ [AGENT 1] Data acquisition successful.”)
try:
extracted_content = result.extracted_content.strip()
if not extracted_content.startswith(‘[‘) and not extracted_content.endswith(‘]’):
extracted_list = [json.loads(extracted_content)]
else:
extracted_list = json.loads(extracted_content)

if not extracted_list:
print(“❌ [AGENT 1] Extracted content list is empty.”)
return None

extracted_data_dict = extracted_list[0]

if isinstance(extracted_data_dict, dict) and ‘error’ in extracted_data_dict:
temp_dict = extracted_data_dict.copy()
del temp_dict[‘error’]
extracted_data_dict = temp_dict

return BritishShorthairInfo.model_validate(extracted_data_dict)
except json.JSONDecodeError as e:
print(f”❌ [AGENT 1] Failed to decode JSON from extracted content: {e}”)
print(f”Content received (first 500 chars): {result.extracted_content[:500]}…”)
return None
except Exception as e:
print(f”❌ [AGENT 1] Error validating extracted data: {e}”)
return None
else:
print(f”❌ [AGENT 1] Data acquisition failed: {result.error_message}”)
if hasattr(llm_strategy, ‘show_usage’):
print(llm_strategy.show_usage())
return None

# Agent 2: Paper Draft Generation Agent
async def generate_paper_draft(cat_info: BritishShorthairInfo) -> Optional[str]:
print(“[AGENT 2: Paper Draft Generation] Starting paper draft creation…”)
if not cat_info:
print(“❌ [AGENT 2] No structured data provided for paper generation.”)
return None

cat_info_json = json.dumps(cat_info.model_dump(), indent=2, ensure_ascii=False)
final_instruction = PAPER_DRAFT_INSTRUCTION.format(cat_info_json=cat_info_json)

messages = [
{“role”: “system”, “content”: “You are an expert academic writer, skilled in compiling factual information into structured research papers.”},
{“role”: “user”, “content”: final_instruction}
]

try:
response = await litellm.acompletion(
model=DEEPSEEK_MODEL,
api_key=DEEPSEEK_API_KEY,
messages=messages,
temperature=0.7
)
draft_content = response.choices[0].message.content
print(“✅ [AGENT 2] Paper draft generated successfully.”)
return draft_content
except Exception as e:
print(f”❌ [AGENT 2] Error generating paper draft: {e}”)
return None

# Agent 3: Local Saving Agent (for Markdown and JSON)
def save_to_local_file(filename: str, content: str, is_json: bool = False) -> bool:
print(f”[AGENT 3: Local Saving] Attempting to save content to {filename}…”)
try:
mode = ‘w’
encoding = ‘utf-8’
if is_json:
# For JSON, content is already a dict/Pydantic model, dump it directly
with open(filename, mode, encoding=encoding) as f:
if isinstance(content, BaseModel):
f.write(content.model_dump_json(indent=2, exclude_none=True)) # Save Pydantic model as pretty JSON
else:
json.dump(content, f, indent=2, ensure_ascii=False) # Fallback for dict
else:
with open(filename, mode, encoding=encoding) as f:
f.write(content)
print(f”✅ [AGENT 3] Content successfully saved to {filename}”)
return True
except Exception as e:
print(f”❌ [AGENT 3] Error saving file: {e}”)
return False

# ── Agent 4: PDF Document Conversion Agent (using TeX Live via Pandoc) ─────────────────────────
def convert_md_to_pdf(input_md_file: str, output_pdf_file: str) -> bool:
print(f”[AGENT 4: PDF Conversion] Attempting to convert {input_md_file} to {output_pdf_file} using Pandoc and TeX Live…”)

# LaTeX Preamble content for headers/footers and Chinese support
# Ensure your system has the font specified in \setCJKmainfont (e.g., Noto Sans CJK SC)
latex_header_content = r”””
\usepackage{fancyhdr}
\pagestyle{fancy}
\fancyhf{} % Clear all headers and footers

% Header: Right side (e.g., Document Title)
\rhead{英国短毛猫研究报告}
% Footer: Center (Page number)
\cfoot{第 \thepage 页}

\renewcommand{\headrulewidth}{0.4pt} % Line under header
\renewcommand{\footrulewidth}{0.4pt} % Line over footer

% For Chinese characters with XeLaTeX
\usepackage{xeCJK}
% Set a common Chinese font. You might need to install ‘fonts-noto-cjk’ on Linux.
% If ‘Noto Sans CJK SC’ is not found, try ‘Source Han Sans SC’, ‘WenQuanYi Micro Hei’ or ‘SimSun’.
\setCJKmainfont{Noto Sans CJK SC}
\XeTeXlinebreaklocale “zh” % Proper line breaking for Chinese
\XeTeXlinebreakskip = 0pt plus 1pt % Adjust line breaking stretch
“””

temp_header_file = None
try:
# Create a temporary file for the LaTeX header content
temp_header_file = tempfile.NamedTemporaryFile(mode=’w’, delete=False, suffix=’.tex’, encoding=’utf-8′)
temp_header_file.write(latex_header_content)
temp_header_file.close()

# Check if xelatex is available in the current PATH
try:
subprocess.run([‘xelatex’, ‘–version’], check=True, capture_output=True, text=True)
print(” ℹ️ xelatex found. Pandoc will use TeX Live for PDF generation.”)
except (subprocess.CalledProcessError, FileNotFoundError):
print(” ⚠️ xelatex not found or not working correctly. Pandoc might fail to create PDF.”)
print(” Please ensure TeX Live 2025 is fully installed and `xelatex` is in your system’s PATH.”)
# Continue anyway, as Pandoc might try other engines or the PATH issue might be transient

# Command: pandoc -s input.md -o output.pdf –pdf-engine=xelatex –include-in-header=temp_header.tex
# -s or –standalone: Produce a standalone document with appropriate headers.
# –pdf-engine=xelatex: Use xelatex for better Chinese support.
# –include-in-header: Inject custom LaTeX preamble.
command = [
‘pandoc’,
‘-s’,
input_md_file,
‘-o’,
output_pdf_file,
‘–pdf-engine=xelatex’,
f’–include-in-header={temp_header_file.name}’
]

result = subprocess.run(command, capture_output=True, text=True, check=True)

print(f”✅ [AGENT 4] Markdown converted to PDF successfully.”)
# print(“Pandoc stdout:”, result.stdout) # Uncomment for debug
# print(“Pandoc stderr:”, result.stderr) # Uncomment for debug
return True
except subprocess.CalledProcessError as e:
print(f”❌ [AGENT 4] Error converting Markdown to PDF: Pandoc exited with code {e.returncode}”)
print(“Pandoc stdout:”, e.stdout)
print(“Pandoc stderr:”, e.stderr)
print(“This often means Pandoc failed to compile LaTeX. Check Pandoc’s stderr for LaTeX errors.”)
print(“Ensure TeX Live is fully installed, `xelatex` is in PATH, and all necessary LaTeX packages (like fancyhdr, xeCJK) are installed (usually included in full TeX Live).”)
return False
except FileNotFoundError as e:
print(f”❌ [AGENT 4] Error: Command not found ({e}). Please ensure Pandoc and xelatex are installed and accessible in your PATH.”)
return False
except Exception as e:
print(f”❌ [AGENT 4] An unexpected error occurred during PDF conversion: {e}”)
return False
finally:
# Clean up the temporary header file
if temp_header_file and os.path.exists(temp_header_file.name):
os.remove(temp_header_file.name)
print(f” ℹ️ Cleaned up temporary LaTeX header file: {temp_header_file.name}”)


# ── 5. Orchestrate the automated workflow ───────────────────────────────
async def automated_workflow():
print(“🚀 Starting automated research paper draft workflow…”)

# Step 1: Data Acquisition & Structuring (Agent 1)
cat_info = await acquire_and_structure_data(URL_TO_SCRAPE)
if not cat_info:
print(“🛑 Workflow aborted due to data acquisition failure.”)
return

# Step 2: Save Extracted Structured Data as JSON
print(f”[WORKFLOW] Saving extracted data to {OUTPUT_JSON_FILENAME}”)
if not save_to_local_file(OUTPUT_JSON_FILENAME, cat_info, is_json=True):
print(“🛑 Workflow aborted due to JSON saving failure.”)
return
print(f”🎉 Structured data saved to: {os.path.abspath(OUTPUT_JSON_FILENAME)}”)

# Step 3: Paper Draft Generation (Agent 2) – from the structured data
paper_draft = await generate_paper_draft(cat_info) # Use the validated Pydantic object
if not paper_draft:
print(“🛑 Workflow aborted due to paper draft generation failure.”)
return

# Step 4: Local Saving Markdown (Agent 3)
if not save_to_local_file(OUTPUT_MD_FILENAME, paper_draft):
print(“🛑 Workflow completed with Markdown saving failure.”)
return

# Step 5: PDF Document Conversion (Agent 4)
pdf_output_path = OUTPUT_MD_FILENAME.replace(“.md”, “.pdf”)
if not convert_md_to_pdf(OUTPUT_MD_FILENAME, pdf_output_path):
print(“🛑 Workflow completed with PDF conversion failure.”)
return

print(“\n🎉 Automated workflow completed successfully! Check your files.”)
print(f”Structured data saved to: {os.path.abspath(OUTPUT_JSON_FILENAME)}”)
print(f”Markdown output saved to: {os.path.abspath(OUTPUT_MD_FILENAME)}”)
print(f”PDF output saved to: {os.path.abspath(pdf_output_path)}”)

if __name__ == “__main__”:
asyncio.run(automated_workflow())

实现智能检索新闻生成海报的AI架构autogen智能体+wan2.2?api调用效果测评

可加V:adoresever

“””
搜索智能体 – 使用 autogen_core 架构 (Powered by Qwen + 智谱 + 阿里通义)
【海报生成最终优化版:精确复现Web UI参数】
工作流程:
1. 用户输入 InitialQuestion
2. QueryGeneratorAgent 接收并生成 SearchQuery
3. SearcherAgent 使用智谱API获取 SearchResults
– 如果无结果,直接跳到步骤 8
4. SummarizerAgent 接收 SearchResults 并生成 FinalAnswer
– 生成答案后,智能判断答案是否有实质内容
– 如果无实质内容,直接跳到步骤 8
5. PosterDesignAgent 接收 FinalAnswer 并生成海报描述
6. Text2ImagePromptAgent 接收海报描述并优化为文生图提示词
7. ImageGeneratorAgent 接收优化后的提示词并调用通义万相API生成图片
8. ResultPrinterAgent 接收最终结果并打印给用户
“””
import os
import json
import requests
import time
import asyncio
from typing import List, Dict, Optional
from datetime import datetime
from asyncio import Event
from pathlib import Path
from http import HTTPStatus

import dashscope
from dashscope.api_entities.dashscope_response import ImageSynthesisResponse

from openai import OpenAI
from dotenv import load_dotenv
from pydantic import BaseModel

from autogen_core import (
DefaultTopicId,
MessageContext,
RoutedAgent,
AgentId,
SingleThreadedAgentRuntime,
default_subscription,
message_handler,
)

# — 配置与初始化 —

load_dotenv()
QWEN_API_KEY = os.getenv(“QWEN_API_KEY”)
ZHIPU_API_KEY = os.getenv(“ZHIPU_API_KEY”)
DASHSCOPE_API_KEY = os.getenv(“DASHSCOPE_API_KEY”)

if not QWEN_API_KEY:
raise ValueError(“请在 .env 文件中设置 QWEN_API_KEY”)
if not ZHIPU_API_KEY:
raise ValueError(“请在 .env 文件中设置 ZHIPU_API_KEY”)
if not DASHSCOPE_API_KEY:
raise ValueError(“请在 .env 文件中设置 DASHSCOPE_API_KEY (值为您的阿里云 AccessKey Secret)”)

qwen_client = OpenAI(
api_key=QWEN_API_KEY,
base_url=”https://dashscope.aliyuncs.com/compatible-mode/v1″,
)

# — 辅助函数 —

def log(agent_name: str, message: str, level: str = “INFO”):
“””打印日志信息”””
timestamp = datetime.now().strftime(“%H:%M:%S”)
color_map = {
“INFO”: “\033[94m”,
“SUCCESS”: “\033[92m”,
“ERROR”: “\033[91m”,
“WARNING”: “\033[93m”,
“ART”: “\033[95m”,
“ENDC”: “\033[0m”
}
color = color_map.get(level, “”)
end_color = color_map[“ENDC”] if color else “”
print(f”[{timestamp}] [{agent_name}] [{color}{level}{end_color}] {message}”)


def qwen_generate_smarter_query(question: str) -> str:
“””让 Qwen 基于用户问题生成更智能、更精准的搜索查询”””
prompt = “””你是一位顶级的AI信息分析师和搜索策略专家。你的任务是基于用户问题,生成一个在搜索引擎中最有可能找到高质量、相关信息的搜索查询。

【工作流程】
1. 分析意图:判断用户是想要定义、原因、影响、比较还是具体数据。
2. 提取要点:识别问题中的关键实体、概念及其关系。
3. 优化与扩展:修正拼写错误,替换或扩展关键词,确保覆盖主要表达方式。
4. 构建查询:生成**简洁、精确、8–15个词**的自然语言搜索语句(避免完整句子,用关键词组合)。

【语言规则】
– 如果问题涉及国际化主题(如科研、科技、医学、全球新闻),请输出**英文查询**。
– 如果问题与中国本地相关(如政策、历史、人物、地区事件),请输出**中文查询**。
– 始终保持查询语言和问题语境一致,避免混合语言。

【输出要求】
– 直接输出最终的查询语句,不要任何解释、前缀、编号或引号。
– 如不足8词,请补充同义词或相关关键词。

【示例】
用户问题:世界上最高的山是哪座?
最终查询:highest mountain in the world height Everest

用户问题:新能源车补贴政策对市场的影响?
最终查询:新能源汽车 补贴 政策 市场 影响 中国 2024
“””
try:
resp = qwen_client.chat.completions.create(
model=”qwen-plus”,
messages=[
{“role”: “system”, “content”: prompt},
{“role”: “user”, “content”: f”用户问题:{question}\n最终查询:”},
],
temperature=0.2,
max_tokens=100,
)
query = resp.choices[0].message.content.strip()
return query.strip(‘”\n ‘)
except Exception as e:
log(“QWEN_QUERY_HELPER”, f”生成智能查询失败: {e}”, “ERROR”)
return question


def zhipu_web_search(query: str, search_type: str = “search_pro”) -> List[Dict]:
“””调用智谱独立的搜索API”””
headers = {
“Authorization”: f”Bearer {ZHIPU_API_KEY}”,
“Content-Type”: “application/json”
}
url = “https://open.bigmodel.cn/api/paas/v4/web_search”
payload = {“search_query”: query, “search_engine”: search_type, “search_intent”: False}
try:
log(“ZHIPU_SEARCH”, f”正在使用 {search_type} 搜索: {query}”, “INFO”)
resp = requests.post(url, headers=headers, json=payload, timeout=30)
if resp.status_code == 200:
data = resp.json()
search_results = data.get(‘search_result’, [])
if search_results:
log(“ZHIPU_SEARCH”, f”成功获取 {len(search_results)} 条搜索结果”, “SUCCESS”)
return [{
“index”: i + 1,
“title”: item.get(“title”, “无标题”),
“url”: item.get(“link”, “”),
“content”: item.get(“content”, “无内容摘要”),
“source”: item.get(“refer”, “未知来源”),
“media_type”: item.get(“media”, “”)
} for i, item in enumerate(search_results)]
else:
log(“ZHIPU_SEARCH”, “搜索API返回空结果”, “WARNING”)
return []
else:
log(“ZHIPU_SEARCH”, f”请求失败,状态码: {resp.status_code}”, “ERROR”)
log(“ZHIPU_SEARCH”, f”响应内容: {resp.text[:500]}”, “ERROR”)
except Exception as e:
log(“ZHIPU_SEARCH”, f”未知错误: {e}”, “ERROR”)
return []


def zhipu_search_with_retry(query: str, max_retries: int = 2) -> List[Dict]:
“””带重试机制的智谱搜索”””
search_engines = [“search_pro”, “search_lite”]
for engine in search_engines:
for attempt in range(max_retries):
results = zhipu_web_search(query, engine)
if results: return results
if attempt < max_retries - 1:
log(“ZHIPU_SEARCH”, f”第 {attempt + 1} 次尝试无结果,重试中…”, “WARNING”)
time.sleep(1)
log(“ZHIPU_SEARCH”, “所有搜索尝试均失败”, “ERROR”)
return []


def format_search_results(results: List[Dict]) -> str:
“””格式化搜索结果用于总结”””
if not results: return “未找到相关搜索结果”
formatted = []
for r in results:
result_text = f”【结果 {r[‘index’]}】\n标题: {r[‘title’]}\n来源: {r[‘source’]}\n”
if r.get(‘url’): result_text += f”链接: {r[‘url’]}\n”
result_text += f”内容摘要: {r[‘content’]}\n”
formatted.append(result_text)
return “\n”.join(formatted)


def qwen_summarize(question: str, search_results: str) -> str:
“””让 Qwen 基于搜索结果生成结构化答案”””
prompt = “””你是一个专业、严谨、客观的分析助手。你的任务是基于下面提供的”网页搜索结果”,为用户的”原始问题”生成一个全面、深入且结构化的回答。

【核心原则】
1. 忠于原文:回答中的所有信息点必须直接来源于提供的搜索结果,禁止凭空编造。
2. 全面整合:综合多个来源,识别核心观点、关键数据和不同角度的看法。
3. 结构化表达:输出必须包含以下三个部分:
– **概要**:对整体问题的简要总结(2-3句话)。
– **详细分析**:按要点或子问题展开,使用列表或小标题组织;每个事实性陈述后必须标注来源编号(如:来源:结果1)。
– **结论**:总结主要发现,并明确指出哪些方面资料不足或存在分歧。
4. 引用来源:确保每个关键信息点后均有来源编号。
5. 信息不足:如果搜索结果无法完全回答问题,需明确指出缺失的部分,而不是泛泛地说”不足”。

【输出要求】
– 用简洁、专业的语言撰写,避免空话和套话。
– 确保回答逻辑清晰,可直接展示给用户。
“””
try:
resp = qwen_client.chat.completions.create(
model=”qwen-plus”,
messages=[
{“role”: “system”, “content”: prompt},
{“role”: “user”, “content”: f”原始问题:{question}\n\n网页搜索结果:\n{search_results}\n\n请基于以上搜索结果提供详细的答案。”},
],
temperature=0.3,
max_tokens=2500,
)
return resp.choices[0].message.content.strip()
except Exception as e:
log(“QWEN_SUMMARIZE”, f”生成答案失败: {e}”, “ERROR”)
return “抱歉,生成答案时遇到问题,请稍后再试。”


def is_answer_conclusive(answer: str) -> bool:
“””
使用 Qwen 判断一个答案是否是实质性的,还是仅仅表示”未找到信息”。
返回 True 表示答案是实质性的,False 表示是否定的/无信息的。
“””
prompt = “””你的任务是判断以下文本是否提供了实质性的信息。
请只回答 “YES” 或 “NO”。

– 如果文本**主要内容**是在解释一个概念、提供数据、分析原因或进行对比,即使它在结尾或部分内容中提到”某些信息未找到”或”仍需发展”,也应被视为提供了实质性信息。请回答 “YES”。
– 只有当文本**通篇**都在表达”未能找到相关信息”、”无法回答”、”搜索结果为空”等类似含义时,才应回答 “NO”。

简单来说,只要文本不仅仅是一句简单的”我找不到”,就回答 “YES”。

文本内容如下:

{text}


你的回答 (YES/NO):”””
try:
resp = qwen_client.chat.completions.create(
model=”qwen-plus”,
messages=[{“role”: “user”, “content”: prompt.format(text=answer)}],
temperature=0.0,
max_tokens=5,
)
decision = resp.choices[0].message.content.strip().upper()
log(“ANSWER_CHECKER”, f”判断答案有效性的结果: ‘{decision}'”, “INFO”)
return “YES” in decision
except Exception as e:
log(“ANSWER_CHECKER”, f”判断答案有效性时出错: {e}”, “ERROR”)
return True


def generate_poster_prompt_from_answer(final_answer: str, original_question: str) -> str:
“””
直接从最终答案生成海报提示词的一体化方法
“””
prompt = “””你是一位资深的信息设计师,擅长将复杂信息转化为视觉海报。

**任务**:基于下面的问答内容,设计一张信息海报的详细描述。

**用户问题**:{question}
**答案内容**:{answer}

**海报设计要求**:

1. **信息提取**:
– 从答案中提取1个核心观点作为主标题
– 选择3-5个关键信息点作为海报内容
– 保留重要的数字、名称、术语

2. **视觉设计规范**:
– 设计竖版海报(适合手机屏幕浏览)
– 标题醒目,占据上方1/3空间
– 中部展示核心信息(图表/图标/要点)
– 底部可包含补充信息或来源

3. **风格指导**:
– 根据内容选择合适风格(科技/商务/教育/新闻等)
– 配色方案要符合主题
– 包含适当的装饰元素增强视觉效果

4. **文字要求**:
– 所有文字必须用引号明确标出
– 中文内容确保表达准确
– 数据必须醒目展示

**输出示例**:
竖版新闻资讯海报,顶部超大标题”GPT-5即将发布”配红色警示效果,中间三个信息卡片分别展示”2025年Q2上线””性能提升10倍””支持视频生成”,卡片使用玻璃拟态效果,底部小字”来源:OpenAI官方”,背景使用浅灰渐变配几何图形装饰,整体现代简约风格

**现在生成海报描述**(100-150字):
“””

try:
# 截取答案的核心部分,避免太长
answer_summary = final_answer[:800] if len(final_answer) > 800 else final_answer

resp = qwen_client.chat.completions.create(
model=”qwen-plus”,
messages=[
{“role”: “user”, “content”: prompt.format(
question=original_question,
answer=answer_summary
)},
],
temperature=0.4,
max_tokens=500,
)
return resp.choices[0].message.content.strip()
except Exception as e:
log(“POSTER_PROMPT_DIRECT”, f”直接生成海报提示词失败: {e}”, “ERROR”)
return “信息展示海报设计”


def qwen_optimize_for_text2img(poster_description: str, original_question: str = None) -> str:
“””
将海报描述转换为优化的中文文生图提示词
专门针对通义万相等中文友好的模型优化
“””
prompt = “””你是一位专业的AI绘图提示词工程师,精通通义万相、文心一格等中文文生图模型。
你的任务是将海报描述转换为通义万相能够准确理解的【中文提示词】。

【输入信息】
海报描述:{poster_desc}
{context}

【转换要求】

1. **核心内容保留**(最重要):
– 保留所有文字内容,确保准确
– 保留关键数据、数字、百分比
– 品牌名、产品名、英文专有名词保持原样

2. **中文描述优化**:
– 使用中文描述场景和风格
– 质量描述:高质量、精细、专业设计、清晰
– 风格描述:现代风格、简约设计、商务风格、科技感(根据内容调整)
– 构图描述:居中构图、对称布局、三分法构图等

3. **提示词结构**:
– 主体在前:先描述是什么(海报、信息图、展板等)
– 内容在中:具体的文字、数据、图表
– 风格在后:视觉效果、色彩、氛围
– 用中文逗号(,)分隔不同要素

4. **通义万相特性优化**:
– 明确指出文字内容:”标题写着…”、”显示文字…”
– 强调文字清晰:”文字清晰可读”、”字体醒目”
– 避免过于复杂的场景描述
– 使用通义万相擅长的风格词:扁平化设计、矢量插画、渐变色彩等

【输出格式】
生成一个纯中文的优化提示词(100-150字),重要元素在前,装饰性描述在后。

【示例】
输入:竖版科技产品发布海报,顶部大字标题”DeepSeek V3.1 震撼发布”,中间展示架构图…
输出:专业科技产品发布海报设计,顶部大标题显示”DeepSeek V3.1 震撼发布”,中央展示UE8M架构图,性能提升图表显示”45%提升”,深蓝到紫色渐变背景,发光特效装饰,高质量信息图设计,现代商务风格,居中对称构图,文字清晰醒目

现在请优化:
“””

context = f”原始问题背景:{original_question}” if original_question else “”

try:
resp = qwen_client.chat.completions.create(
model=”qwen-plus”,
messages=[
{“role”: “user”, “content”: prompt.format(
poster_desc=poster_description,
context=context
)},
],
temperature=0.3,
max_tokens=400,
)
return resp.choices[0].message.content.strip()
except Exception as e:
log(“QWEN_T2I_OPTIMIZE”, f”优化文生图提示词失败: {e}”, “ERROR”)
return poster_description


# ==================== 代码修改区域 START ====================
def aliyun_text_to_image_enhanced(prompt: str, model_id: str = “wan2.2-t2i-flash”) -> Optional[str]:
“””
使用优化后的中文提示词生成图片
【最终修正版】根据Web UI截图精确复现参数
“””
dashscope.api_key = DASHSCOPE_API_KEY
output_dir = Path(“outputs”)
output_dir.mkdir(exist_ok=True)

try:
log(“ALIYUN_T2I”, f”正在使用模型 ‘{model_id}’ 生成图片…”, “ART”)
log(“ALIYUN_T2I”, f”中文提示词预览: {prompt[:150]}…”, “INFO”)

# 针对中文海报优化的负面提示词
negative_prompt = (
“乱码文字, 无法阅读的文本, 错误的文字, 丑陋的字体, 拼写错误, “
“低质量, 模糊, 扭曲, 丑陋, 多余的手指, “
“糟糕的构图, 混乱的布局, 业余设计, 元素重叠”
)

# 【最终修改】完全按照Web UI的参数进行配置
response: ImageSynthesisResponse = dashscope.ImageSynthesis.call(
model=model_id,
prompt=prompt,
negative_prompt=negative_prompt,
n=1,
# 关键点 1: 尺寸 (Size) – 完全匹配UI
size=’832*1088′,
# 关键点 2: 风格 (Style) – 模拟 “prompt_extend” 和提示词内容
style=’‘, # 使用“扁平肌理”风格,更贴合提示词描述
# 关键点 3: 种子 (Seed) – 保证结果可复现
seed=1234,
)

if response.status_code == HTTPStatus.OK:
if response.output and response.output.results:
image_url = response.output.results[0].url
log(“ALIYUN_T2I”, “图片生成成功,正在下载…”, “SUCCESS”)

image_response = requests.get(image_url, timeout=30)
if image_response.status_code == 200:
timestamp = datetime.now().strftime(“%Y%m%d_%H%M%S”)

if “海报” in prompt:
filename = f”poster_{timestamp}.png”
elif “信息图” in prompt:
filename = f”infographic_{timestamp}.png”
else:
filename = f”generated_{timestamp}.png”

file_path = output_dir / filename
with open(file_path, ‘wb’) as f:
f.write(image_response.content)

log(“ALIYUN_T2I”, f”图片已保存至: {file_path}”, “SUCCESS”)
return str(file_path)
else:
log(“ALIYUN_T2I”, f”下载失败: {image_response.status_code}”, “ERROR”)
else:
log(“ALIYUN_T2I”, “API返回空结果”, “ERROR”)
else:
log(“ALIYUN_T2I”, f”API调用失败: {response.code} – {response.message}”, “ERROR”)

except Exception as e:
log(“ALIYUN_T2I”, f”生成图片时发生错误: {e}”, “ERROR”)

return None
# ==================== 代码修改区域 END ====================


# — 消息定义 —
class InitialQuestion(BaseModel):
content: str
start_time: float
completion_event: Event
class Config: arbitrary_types_allowed = True

class SearchQuery(BaseModel):
content: str
original_question: InitialQuestion

class SearchResults(BaseModel):
content: List[Dict]
original_question: InitialQuestion
search_query: str

class FinalAnswer(BaseModel):
content: str
original_question: InitialQuestion

class PosterDescription(BaseModel):
content: str
original_final_answer: FinalAnswer

class OptimizedPrompt(BaseModel):
content: str
original_final_answer: FinalAnswer

class FinalResultWithImage(BaseModel):
final_answer: FinalAnswer
image_prompt: str
image_path: Optional[str]


# — Agent 定义 —

@default_subscription
class QueryGeneratorAgent(RoutedAgent):
def __init__(self) -> None:
super().__init__(“An agent that generates a search query.”)

@message_handler
async def handle_initial_question(self, message: InitialQuestion, ctx: MessageContext) -> None:
log(self.id, “【步骤 1/7】收到初始问题,正在生成智能搜索查询…”)
query = qwen_generate_smarter_query(message.content)
log(self.id, f”生成查询: {query}”, “SUCCESS”)
await self.publish_message(
SearchQuery(content=query, original_question=message),
DefaultTopicId()
)


@default_subscription
class SearcherAgent(RoutedAgent):
def __init__(self) -> None:
super().__init__(“An agent that performs web searches.”)

@message_handler
async def handle_search_query(self, message: SearchQuery, ctx: MessageContext) -> None:
log(self.id, f”【步骤 2/7】收到查询 ‘{message.content}’, 正在执行搜索…”)
results = zhipu_search_with_retry(message.content, max_retries=2)

if results:
log(self.id, f”搜索完成,找到 {len(results)} 条结果。”, “SUCCESS”)
await self.publish_message(
SearchResults(
content=results,
original_question=message.original_question,
search_query=message.content
),
DefaultTopicId()
)
else:
log(self.id, “未能获取搜索结果,将直接结束流程。”, “WARNING”)
no_result_answer = FinalAnswer(
content=f”抱歉,未能找到关于 ‘{message.content}’ 的任何相关信息。”,
original_question=message.original_question
)
final_result = FinalResultWithImage(
final_answer=no_result_answer,
image_prompt=”由于未找到搜索结果,因此跳过了图片生成。”,
image_path=None
)
await self.publish_message(final_result, DefaultTopicId())


@default_subscription
class SummarizerAgent(RoutedAgent):
def __init__(self) -> None:
super().__init__(“An agent that summarizes search results.”)

@message_handler
async def handle_search_results(self, message: SearchResults, ctx: MessageContext) -> None:
log(self.id, “【步骤 3/7】收到搜索结果,正在生成最终答案…”)
formatted_results = format_search_results(message.content)
final_answer_content = qwen_summarize(message.original_question.content, formatted_results)
log(self.id, “答案生成完成。”, “SUCCESS”)

log(self.id, “正在智能分析答案的有效性…”, “INFO”)
if is_answer_conclusive(final_answer_content):
log(self.id, “答案有效,流程继续…”, “SUCCESS”)
await self.publish_message(
FinalAnswer(
content=final_answer_content,
original_question=message.original_question
),
DefaultTopicId()
)
else:
log(self.id, “答案无效 (未找到实质性信息),将直接结束流程。”, “WARNING”)
final_answer_obj = FinalAnswer(
content=final_answer_content,
original_question=message.original_question
)
final_result = FinalResultWithImage(
final_answer=final_answer_obj,
image_prompt=”由于搜索结果未能提供实质性答案,因此跳过了图片生成。”,
image_path=None
)
await self.publish_message(final_result, DefaultTopicId())


@default_subscription
class PosterDesignAgent(RoutedAgent):
“””专门负责海报设计方案生成的Agent”””

def __init__(self) -> None:
super().__init__(“An agent that generates poster design descriptions.”)

@message_handler
async def handle_final_answer(self, message: FinalAnswer, ctx: MessageContext) -> None:
log(self.id, “【步骤 4/7】收到最终答案,正在生成海报设计方案…”, “ART”)

# 直接从答案生成海报描述
poster_description = generate_poster_prompt_from_answer(
message.content,
message.original_question.content
)

log(self.id, f”海报设计方案生成完成”, “SUCCESS”)
log(self.id, f”方案预览: {poster_description[:100]}…”, “INFO”)

# 发送给下一个Agent
await self.publish_message(
PosterDescription(
content=poster_description,
original_final_answer=message
),
DefaultTopicId()
)


@default_subscription
class Text2ImagePromptAgent(RoutedAgent):
“””专门负责将海报描述优化为文生图提示词的Agent”””

def __init__(self) -> None:
super().__init__(“An agent that optimizes prompts for text-to-image generation.”)

@message_handler
async def handle_poster_description(self, message: PosterDescription, ctx: MessageContext) -> None:
log(self.id, “【步骤 5/7】收到海报描述,正在优化为文生图提示词…”, “ART”)

poster_description = message.content
original_question = message.original_final_answer.original_question.content

# 优化为文生图提示词
optimized_prompt = qwen_optimize_for_text2img(
poster_description,
original_question
)

log(self.id, f”文生图提示词优化完成”, “SUCCESS”)
log(self.id, f”优化后: {optimized_prompt[:100]}…”, “INFO”)

# 发送给图片生成Agent
await self.publish_message(
OptimizedPrompt(
content=optimized_prompt,
original_final_answer=message.original_final_answer
),
DefaultTopicId()
)


@default_subscription
class ImageGeneratorAgent(RoutedAgent):
“””负责调用通义万相生成图片的Agent”””

def __init__(self) -> None:
super().__init__(“An agent that generates images.”)

@message_handler
async def handle_optimized_prompt(self, message: OptimizedPrompt, ctx: MessageContext) -> None:
log(self.id, “【步骤 6/7】收到优化后的提示词,正在调用通义万相生成图片…”)

# 生成图片
image_path = aliyun_text_to_image_enhanced(message.content)

if image_path:
log(self.id, “图片生成成功!”, “SUCCESS”)
else:
log(self.id, “图片生成失败。”, “ERROR”)

# 发送最终结果
await self.publish_message(
FinalResultWithImage(
final_answer=message.original_final_answer,
image_prompt=message.content,
image_path=image_path
),
DefaultTopicId()
)


@default_subscription
class ResultPrinterAgent(RoutedAgent):
“””负责打印最终结果的Agent”””

def __init__(self) -> None:
super().__init__(“An agent that prints the final result.”)

@message_handler
async def handle_final_result_with_image(self, message: FinalResultWithImage, ctx: MessageContext) -> None:
log(self.id, “【步骤 7/7】收到最终结果,准备输出。”)

final_answer = message.final_answer
elapsed_time = time.time() – final_answer.original_question.start_time

# 打印结果
print(“\n” + “=”*60 + “\n📊 最终答案\n” + “=”*60)
print(final_answer.content)

print(“\n” + “=”*60 + “\n🎨 文生图提示词\n” + “=”*60)
print(message.image_prompt)

print(“\n” + “=”*60 + “\n🖼️ 生成的图片\n” + “=”*60)
if message.image_path:
print(f”✅ 图片已成功保存至: {message.image_path}”)
print(f”📁 请在 outputs 文件夹中查看生成的海报”)
elif “跳过了图片生成” in message.image_prompt:
print(f”⚠️ {message.image_prompt}”)
else:
print(“❌ 图片生成失败,请检查日志获取详细信息。”)

print(“\n” + “=”*60 + f”\n⏱️ 总耗时: {elapsed_time:.2f} 秒\n” + “=”*60)

# 设置完成事件
final_answer.original_question.completion_event.set()


# — 主程序 —
async def main():
print(“\n” + “🚀 ” + “=”*56 + ” 🚀”)
print(” 欢迎使用智能搜索与海报生成系统 (V7.1)”)
print(” Powered by autogen_core + Qwen + 智谱 + 阿里通义”)
print(“🚀 ” + “=”*56 + ” 🚀”)
print(“\n功能特色:”)
print(” 📝 智能搜索:基于问题生成最优搜索策略”)
print(” 🔍 信息整合:从多源数据中提取核心信息”)
print(” 🎨 海报设计:自动生成专业的信息海报”)
print(” 🖼️ AI绘图:使用通义万相生成高质量图片”)
print(“\n输入 ‘quit’ 或 ‘exit’ 退出程序\n” + “-” * 64)

# 创建运行时
runtime = SingleThreadedAgentRuntime()

# 注册所有Agent
await QueryGeneratorAgent.register(
runtime, “query_generator”,
lambda: QueryGeneratorAgent()
)
await SearcherAgent.register(
runtime, “searcher”,
lambda: SearcherAgent()
)
await SummarizerAgent.register(
runtime, “summarizer”,
lambda: SummarizerAgent()
)
await PosterDesignAgent.register(
runtime, “poster_designer”,
lambda: PosterDesignAgent()
)
await Text2ImagePromptAgent.register(
runtime, “text2image_optimizer”,
lambda: Text2ImagePromptAgent()
)
await ImageGeneratorAgent.register(
runtime, “image_generator”,
lambda: ImageGeneratorAgent()
)
await ResultPrinterAgent.register(
runtime, “result_printer”,
lambda: ResultPrinterAgent()
)

# 启动运行时
runtime.start()

try:
while True:
# 创建完成事件
completion_event = asyncio.Event()

# 获取用户输入
question = input(“\n💭 请输入您的问题: “).strip()

if not question:
continue

if question.lower() in [‘quit’, ‘exit’, ‘q’]:
print(“\n👋 感谢使用,再见!”)
break

# 显示处理开始
print(“\n” + “=”*64)
print(“🔍 智能搜索与海报生成系统”)
print(“=”*64)
print(f”📝 您的问题: {question}\n”)

# 发送初始消息
await runtime.send_message(
InitialQuestion(
content=question,
start_time=time.time(),
completion_event=completion_event
),
AgentId(“query_generator”, “default”)
)

# 等待处理完成
await completion_event.wait()

finally:
log(“MAIN”, “正在停止运行时…”, “INFO”)
await runtime.stop()
log(“MAIN”, “系统已安全关闭”, “SUCCESS”)


if __name__ == “__main__”:
try:
# 运行主程序
asyncio.run(main())
except KeyboardInterrupt:
print(“\n\n👋 程序已中断,再见!”)
except Exception as e:
print(f”\n❌ 程序发生错误: {e}”)
import traceback
traceback.print_exc()

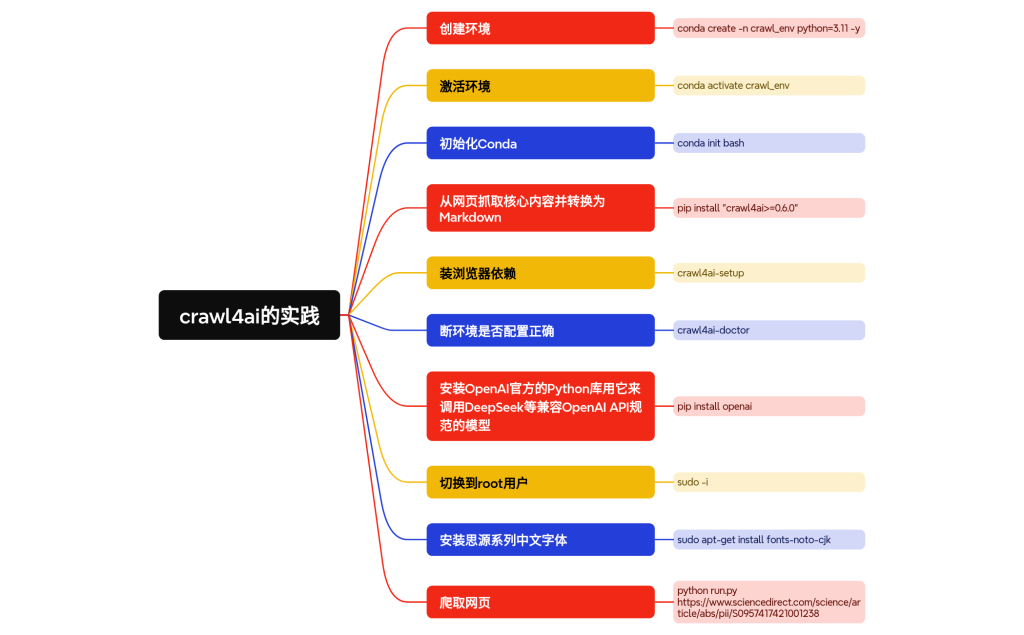
crawl4ai负责爬取,openai库调用DeepSeek进行分析,LaTeX负责生成报告

整体流程:

创建环境: conda create -n crawl_env python=3.11 -y
激活环境: conda activate crawl_env
初始化Conda:conda init bash
从网页抓取核心内容并转换为Markdown:pip install “crawl4ai>=0.6.0”
setup 用于安装浏览器依赖,doctor 用于诊断环境是否配置正确:crawl4ai-setup 和 crawl4ai-doctor
安装OpenAI官方的Python库用它来调用DeepSeek等兼容OpenAI API规范的模型:pip install openai
切换到root用户: sudo -i
安装思源系列中文字体:sudo apt-get install fonts-noto-cjk

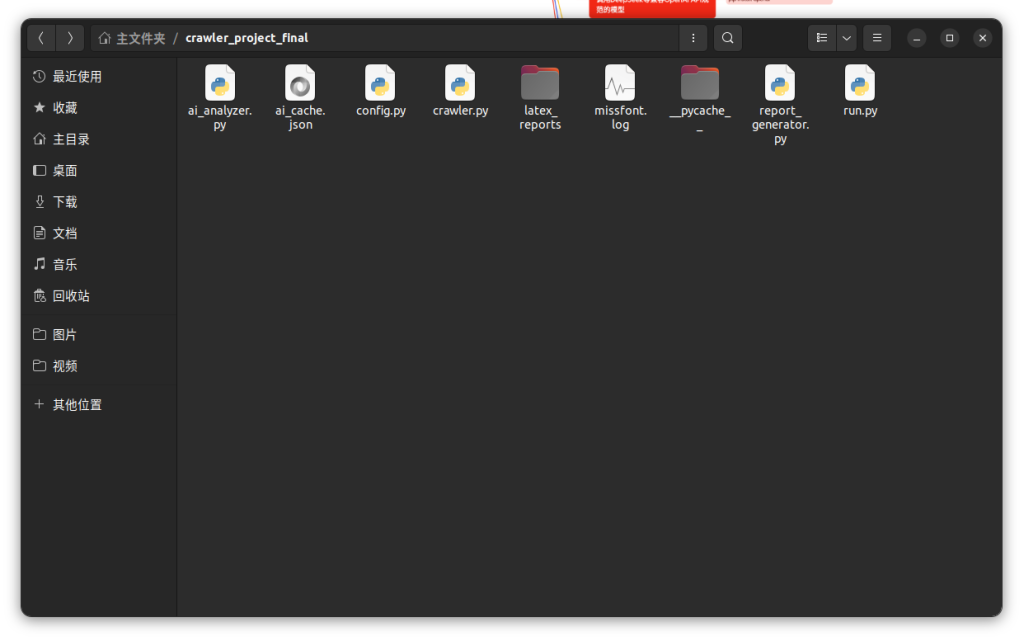
目录结构:

源码:

# ai_analyzer.py (修正版,增强章节定位能力)
# 负责与DeepSeek API交互,进行多任务分析

import asyncio
import re
import json
import os
from openai import AsyncOpenAI
from config import DEEPSEEK_API_KEY, DEEPSEEK_BASE_URL, DEFAULT_MODEL, CACHE_FILE

client = AsyncOpenAI(api_key=DEEPSEEK_API_KEY, base_url=DEEPSEEK_BASE_URL)

def _load_cache() -> dict:
    # ... (这部分函数保持不变) ...
    if os.path.exists(CACHE_FILE):
        with open(CACHE_FILE, 'r', encoding='utf-8') as f:
            try:
                return json.load(f)
            except json.JSONDecodeError:
                return {}
    return {}

def _save_cache(cache_data: dict):
    # ... (这部分函数保持不变) ...
    with open(CACHE_FILE, 'w', encoding='utf-8') as f:
        json.dump(cache_data, f, ensure_ascii=False, indent=4)

async def _call_ai(system_prompt: str, user_content: str, model: str) -> str | None:
    # ... (这部分函数保持不变) ...
    try:
        completion = await client.chat.completions.create(
            model=model,
            messages=[
                {"role": "system", "content": system_prompt},
                {"role": "user", "content": user_content}
            ],
            stream=False
        )
        return completion.choices[0].message.content
    except Exception as e:
        print(f"❌ 调用AI时发生错误: {e}")
        return None

async def analyze_content(full_markdown: str, url: str, model: str = DEFAULT_MODEL) -> dict | None:
    cache = _load_cache()
    cache_key = url
    if cache_key in cache and all(k in cache[cache_key] for k in ["abstract_translation", "main_body_summary", "conclusion_summary"]):
        print("✅ 从本地缓存中加载AI分析结果!")
        return cache[cache_key]

    print(f"➡️ [步骤 2/4] 本地无缓存,正在连接AI进行分析 (模型: {model})...")
    
    prompts = {
        "abstract": "You are a professional academic translator. Your task is to accurately translate the following research paper abstract into simplified Chinese.",
        "main_body": "You are an expert academic analyst. Summarize the core contributions, methods, and key findings from the main body of the following article in about 300-500 words. Present your summary in a structured, easy-to-read format in simplified Chinese.",
        "conclusion": "You are an expert academic analyst. Your task is to summarize the conclusion section of the following article, highlighting the main takeaways and future work mentioned. Provide the summary in simplified Chinese."
    }
    abstract_regex = r'(?i)(?:#+\s*|\n)\s*(?:\d*\.?\s*)?Abstract\n(.*?)(?=\n#+\s|\n\d*\.?\s*Introduction)'
    conclusion_regex = r'(?i)(?:#+\s*|\n)\s*(?:\d*\.?\s*)?Conclusion(?:s)?\n(.*?)(?=\n#+\s|\n\d*\.?\s*(?:References|Acknowledgements|Appendix))'

    abstract_content_match = re.search(abstract_regex, full_markdown, re.DOTALL)
    conclusion_content_match = re.search(conclusion_regex, full_markdown, re.DOTALL)
    
    # 提取内容,如果找不到匹配项则提供明确提示
    abstract_text = abstract_content_match.group(1).strip() if abstract_content_match else "Abstract not found in the document."
    conclusion_text = conclusion_content_match.group(1).strip() if conclusion_content_match else "Conclusion not found in the document."

    # 主体内容逻辑保持不变
    main_body_content = full_markdown
    if abstract_content_match and conclusion_content_match:
       main_body_start = abstract_content_match.end()
       main_body_end = conclusion_content_match.start()
       main_body_content = full_markdown[main_body_start:main_body_end]

    tasks = {
        "abstract_translation": _call_ai(prompts["abstract"], abstract_text, model),
        "main_body_summary": _call_ai(prompts["main_body"], main_body_content, model),
        "conclusion_summary": _call_ai(prompts["conclusion"], conclusion_text, model),
    }
    
    results = await asyncio.gather(*tasks.values())
    summaries = dict(zip(tasks.keys(), results))

    if not all(summaries.values()):
        print("❌ AI总结失败,部分内容未能生成。")
        return None
    
    print("✅ AI分析完成!正在将结果存入本地缓存...")
    
    cache[cache_key] = summaries
    _save_cache(cache)
    
    return summaries

修改你需要的模型:

# config.py
# 存放所有配置信息

import os

# ==============================================================================
#  API与模型配置
# ==============================================================================

# 您的API密钥。
DEEPSEEK_API_KEY = "  "

# DeepSeek的API服务器地址
DEEPSEEK_BASE_URL = "https://api.deepseek.com/v1"

# 要使用的AI模型名称
DEFAULT_MODEL = "deepseek-chat"

# ==============================================================================
#  输出配置
# ==============================================================================

# 生成的报告存放的文件夹名称
OUTPUT_DIR = "latex_reports"

# ==============================================================================
#  缓存配置
# ==============================================================================
# AI分析结果的缓存文件
CACHE_FILE = "ai_cache.json"
# crawler.py
# 负责爬取网页内容

import re
from crawl4ai import AsyncWebCrawler

async def fetch_article_data(url: str) -> tuple[str | None, str | None]:
    """
    爬取指定URL的网页,提取Markdown内容和标题。
    
    返回: (markdown_content, title) 或 (None, None)
    """
    print(f"➡️ [步骤 1/4] 正在爬取文献内容: {url}")
    crawler = AsyncWebCrawler()
    try:
        result = await crawler.arun(url=url)
        if not result or not result.markdown:
            print(f"❌ 爬取失败: 未能从 {url} 提取到有效内容。")
            return None, None
        
        # 尝试从Markdown中提取第一个一级标题
        title_match = re.search(r"^#\s+(.*)", result.markdown, re.MULTILINE)
        title = title_match.group(1).strip() if title_match else "Untitled Document"
        
        print("✅ 内容爬取成功!")
        return result.markdown, title
    except Exception as e:
        print(f"❌ 爬取时发生错误: {e}")
        return None, None
# report_generator.py
# 负责生成LaTeX源码并编译成PDF

import os
import re
import subprocess
from datetime import datetime
from config import OUTPUT_DIR

def _latex_escape(text: str) -> str:
    """对文本进行转义以安全插入LaTeX。"""
    replacements = {
        '&': r'\&', '%': r'\%', '$': r'\$', '#': r'\#', '_': r'\_',
        '{': r'\{', '}': r'\}', '~': r'\textasciitilde{}',
        '^': r'\textasciicircum{}', '\\': r'\textbackslash{}',
    }
    return re.sub(r'[&%$#_{}\\~^]', lambda m: replacements[m.group(0)], text)

def _create_latex_source(data: dict) -> str:
    """根据数据生成LaTeX源文件内容。"""
    title_escaped = _latex_escape(data['title'])
    url_escaped = _latex_escape(data['url'])
    abstract_escaped = _latex_escape(data.get('abstract_translation', ''))
    main_body_escaped = _latex_escape(data.get('main_body_summary', ''))
    conclusion_escaped = _latex_escape(data.get('conclusion_summary', ''))

    latex_template = rf"""
\documentclass[12pt, a4paper]{{article}}
\usepackage{{ctex}}
\usepackage[top=2.5cm, bottom=2.5cm, left=2.5cm, right=2.5cm]{{geometry}}
\usepackage{{fancyhdr}}
\usepackage{{hyperref}}
\usepackage{{titling}}
\setmainfont{{Times New Roman}}

\pagestyle{{fancy}}
\fancyhf{{}}
\fancyhead[C]{{{title_escaped}}}
\fancyfoot[C]{{\thepage}}
\renewcommand{{\headrulewidth}}{{0.4pt}}
\renewcommand{{\footrulewidth}}{{0.4pt}}

\pretitle{{\begin{{center}}\LARGE\bfseries}}\posttitle{{\end{{center}}}}
\preauthor{{\begin{{center}}\large}}\postauthor{{\end{{center}}}}
\predate{{\begin{{center}}\large}}\postdate{{\end{{center}}}}

\title{{{title_escaped}}}
\author{{文献来源: \href{{{url_escaped}}}{{{url_escaped}}}}}
\date{{AI总结报告生成于: {data['date']}}}

\begin{{document}}
\maketitle
\thispagestyle{{fancy}}
\section*{{摘要翻译}}
{abstract_escaped}
\section*{{核心内容总结}}
{main_body_escaped}
\section*{{结论总结}}
{conclusion_escaped}
\end{{document}}
"""
    return latex_template


def generate_pdf_report(report_data: dict):
    print("➡️ [步骤 3/4] 正在生成LaTeX报告源文件...")
    tex_source = _create_latex_source(report_data)
    print("✅ LaTeX源文件生成完毕!")
    
    print("➡️ [步骤 4/4] 正在编译PDF报告...")
    os.makedirs(OUTPUT_DIR, exist_ok=True)
    
    title = report_data.get('title', 'report')
    filename_base = re.sub(r'[\\/*?:"<>|]', "", title).replace(" ", "_")[:50]
    tex_filepath = os.path.join(OUTPUT_DIR, f"{filename_base}.tex")
    
    with open(tex_filepath, 'w', encoding='utf-8') as f:
        f.write(tex_source)

    command = ['xelatex', '-interaction=nonstopmode', f'-output-directory={OUTPUT_DIR}', tex_filepath]
    
    for i in range(2):
        print(f"   ... LaTeX编译中 (第 {i+1}/2 轮)")
        result = subprocess.run(command, capture_output=True, text=True, encoding='utf-8')
        if result.returncode != 0:
            log_path = os.path.join(OUTPUT_DIR, f'{filename_base}.log')
            print(f"❌ PDF编译失败!请查看日志: {log_path}")
            print("-" * 20 + " LaTeX 错误日志 " + "-" * 20)
            if os.path.exists(log_path):
                with open(log_path, 'r', encoding='utf-8') as log_file:
                    print("".join(log_file.readlines()[-30:]))
            print("-" * 55)
            return
            
    for ext in ['.aux', '.log', '.out', '.tex']:
        try:
            os.remove(os.path.join(OUTPUT_DIR, f"{filename_base}{ext}"))
        except OSError:
            pass

    pdf_filepath = os.path.join(OUTPUT_DIR, f"{filename_base}.pdf")
    print(f"🎉 报告生成成功!文件已保存至: {os.path.abspath(pdf_filepath)}")

# run.py (带缓存功能)
# 主程序入口,负责调度所有模块

import asyncio
import sys
import argparse
import subprocess
import os
import json
from datetime import datetime

import config
from crawler import fetch_article_data
from ai_analyzer import analyze_content
from report_generator import generate_pdf_report

def check_dependencies():
    """检查必要的外部依赖(API密钥和LaTeX)。"""
    if not config.DEEPSEEK_API_KEY:
         print("❌ 错误: API密钥未在 config.py 中配置!")
         sys.exit(1)
    
    try:
        subprocess.run(['xelatex', '-version'], check=True, capture_output=True)
    except (subprocess.CalledProcessError, FileNotFoundError):
        print("❌ 错误: 系统中未找到 'xelatex' 命令。请先安装LaTeX发行版。")
        sys.exit(1)

async def main():
    """主执行流程"""
    parser = argparse.ArgumentParser(description="学术文献AI总结报告生成器 V2.1 (带缓存)")
    parser.add_argument('url', help="要处理的学术文献URL。")
    parser.add_argument('--model', default=config.DEFAULT_MODEL, help=f"使用的DeepSeek模型 (默认: {config.DEFAULT_MODEL})。")
    parser.add_argument('--force-reanalyze', action='store_true', help="强制重新进行AI分析,忽略此URL的现有缓存。")
    args = parser.parse_args()

    # 如果用户选择强制刷新,我们先从缓存中删除该URL的记录
    if args.force_reanalyze and os.path.exists(config.CACHE_FILE):
        print("🌀 用户选择强制重新分析,将更新此URL的缓存。")
        try:
            with open(config.CACHE_FILE, 'r', encoding='utf-8') as f:
                cache = json.load(f)
            if args.url in cache:
                del cache[args.url]
                with open(config.CACHE_FILE, 'w', encoding='utf-8') as f:
                    json.dump(cache, f, ensure_ascii=False, indent=4)
                print(f"   已从缓存中移除URL: {args.url}")
        except (json.JSONDecodeError, FileNotFoundError):
            pass # 如果缓存文件有问题,忽略即可

    # 1. 爬取
    markdown, title = await fetch_article_data(args.url)
    if not markdown:
        return

    # 2. AI分析
    summaries = await analyze_content(markdown, args.url, args.model)
    if not summaries:
        return

    # 3. 整合数据并生成报告
    report_data = {
        "title": title,
        "url": args.url,
        "date": datetime.now().strftime('%Y年%m月%d日'),
        **summaries
    }
    generate_pdf_report(report_data)

if __name__ == "__main__":
    print("--- 启动报告生成器 (带缓存功能) ---")
    check_dependencies()
    asyncio.run(main())
    print("--- 报告生成器运行完毕 ---")

爬取生成PDF:在latex_reports文件夹下

AutoGen框架深度解析:我如何用Python构建一个“AI足球分析师”团队?

*注意修改配置栏*

import asyncio
import json
import os
from datetime import datetime
from tavily import TavilyClient
from autogen_agentchat.agents import AssistantAgent
from autogen_ext.models.openai import OpenAIChatCompletionClient
from autogen_agentchat.messages import TextMessage

# ================== 配置 ==================
API_KEY = “sk-your API_KEY”
BASE_URL = “模型对应的URL”
MODEL = “模型名称”
TAVILY_API_KEY = “tvly-your TAVILY_API_KEY”

# 初始化客户端
model_client = OpenAIChatCompletionClient(model=MODEL, base_url=BASE_URL, api_key=API_KEY, model_info={“vision”: False, “function_calling”: True, “json_output”: True, “family”: “gpt-4”}, temperature=0.3)
tavily_client = TavilyClient(api_key=TAVILY_API_KEY)

# ================== 定义专家Agent团队 (全自动版) ==================

# Agent 1: 足球数据研究员 (负责规划与搜索)
research_planner = AssistantAgent(
name=”Research_Planner”,
model_client=model_client,
system_message=”””你是顶级的足球数据研究员。你的任务是接收用户关于一场比赛的预测问题,
然后制定一个全面的数据搜集计划,用于Tavily搜索引擎。

你的计划必须涵盖以下几个方面,以确保分析的全面性:
1. 两队之间的**历史交锋记录** (Head-to-Head)。
2. 每支球队**各自最近的比赛战绩**和状态 (Recent Form)。
3. 任何关于球队的**最新新闻**,如关键球员伤病、教练变动等 (Latest News)。

你的输出必须是标准的JSON格式,只包含一个’search_queries’键,其值为一个关键词列表。

示例输入: “预测 皇家马德里 vs 巴塞罗那 的比分”
你的输出:
{
“search_queries”: [
“Real Madrid vs Barcelona head to head results”,
“Real Madrid recent match results La Liga”,
“Barcelona recent match results La Liga”,
“Real Madrid team news injuries”,
“Barcelona team news formation”
]
}
“””
)

# Agent 2: 首席战术分析与评论员 (负责分析与报告)
final_reporter = AssistantAgent(
name=”Final_Reporter”,
model_client=model_client,
system_message=”””你是世界顶级的足球战术分析师兼专栏作家。
你的任务是接收一堆从网络上搜集来的、关于一场比赛的原始、非结构化文本资料。

你需要执行以下两个核心步骤来完成任务:
1. **数据提取与分析**: 首先,你必须仔细阅读所有资料,从中提取出结构化的关键信息,特别是【以往战绩】(包括历史交锋和近期战绩)。然后,基于这些提取出的数据进行深度战术分析,并形成你自己的胜率和比分预测。
2. **报告撰写**: 接着,你需要将你的所有分析和提取出的数据,撰写成一篇精彩、完整的赛前分析报告。

你的最终报告**必须**包含一个清晰的【以往战绩】部分,详细列出你找到的比赛记录。
报告的整体结构应包括:标题、核心看点、以往战绩回顾、战术分析、胜率与比分预测、总结。
“””
)

# ================== 工具与辅助函数 ==================

def perform_web_search_tool(queries: list) -> str:
print(f”\n— [Tool: Web Search] 正在执行深度搜索… —“)
raw_content = “”
try:
# 为了获取更全面的信息,我们对每个查询请求更多结果
all_results = []
for query in queries:
response = tavily_client.search(query=query, search_depth=”advanced”, max_results=5)
all_results.extend(response[‘results’])
raw_content = “\n\n—\n\n”.join([f”来源: {item.get(‘url’, ‘N/A’)}\n内容: {item.get(‘content’, ”)}” for item in all_results])
print(f”— [Tool: Web Search] 搜索完成,共找到 {len(all_results)} 条结果 —“)
except Exception as e:
print(f”— [Tool: Web Search] 搜索出错: {e}”)
return raw_content

def save_report_to_file(report_content: str, teams_input: str) -> None:
os.makedirs(“soccer_automated_reports”, exist_ok=True)
timestamp = datetime.now().strftime(“%Y%m%d_%H%M%S”)
safe_subject = “”.join([c if c.isalnum() else “_” for c in teams_input.replace(“vs”, “”)[:30]])
filename = f”soccer_automated_reports/{safe_subject}_{timestamp}.txt”
with open(filename, ‘w’, encoding=’utf-8′) as f: f.write(report_content)
print(f”\n— [System] 最终分析报告已保存至: {filename} —“)

# ================== 主工作流 (全自动版) ==================

async def process_prediction_request(core_question: str):
print(f”\n> 收到预测任务: {core_question}”)

# — 阶段一: 研究员规划并执行搜索 —
print(“\n— [Research Planner] 正在规划数据搜集策略… —“)

planner_input = TextMessage(content=core_question, source=”user”)
response_planner = await research_planner.on_messages([planner_input], None)
plan_json = response_planner.chat_message.content

print(“— [Research Planner] 搜集计划已生成 —“)
print(plan_json)

try:
plan = json.loads(plan_json.strip().lstrip(““`json”).rstrip(““`”))
search_queries = plan.get(“search_queries”, [])
except json.JSONDecodeError:
print(“错误:研究员未能生成有效的JSON计划,任务中断。”)
return

if not search_queries:
print(“未能从计划中提取到搜索关键词。”)
return

# (执行工具)
raw_data_from_web = perform_web_search_tool(search_queries)

# — 阶段二: 最终报告人进行分析与撰写 —
print(“\n— [Final Reporter] 正在分析数据并撰写最终报告… —“)

reporter_prompt = f”””
请基于以下从网络上搜集到的关于 ‘{core_question}’ 的原始资料,
提取关键战绩,进行深度分析,并撰写一份包含【以往战绩】的最终报告。

【原始资料】:

{raw_data_from_web}

“””
reporter_input = TextMessage(content=reporter_prompt, source=”user”)
response_reporter = await final_reporter.on_messages([reporter_input], None)
final_report = response_reporter.chat_message.content

print(“\n” + “=”*60 + “\n📋 最终分析报告 📋\n” + “=”*60)
print(final_report)

# 提取队名用于保存文件
try:
teams_input = core_question.split(“预测”)[1].split(“的”)[0].strip()
except:
teams_input = “match_prediction”

save_report_to_file(final_report, teams_input)


async def main():
print(“=”*60 + “\n⚽ 足球赛事预测系统启动 ⚽\n” + “=”*60)

while True:
print(“\n” + “#”*60)
core_question = input(“请输入您想预测的比赛 (例如: 预测 徐州队 vs 无锡队 的胜负和比分),或输入’exit’退出:\n> “)
if core_question.strip().lower() in [‘exit’, ‘quit’]:
print(“感谢使用,再见!”)
break
if not core_question.strip():
continue

await process_prediction_request(core_question)

if __name__ == “__main__”:
try:
asyncio.run(main())
except KeyboardInterrupt:
print(“\n程序被中断。”)

如果下载失败,复制下面代码命名requirements.txt与上段代码(soccer_analyst_v3.py)保存在同一文件夹下

aiofiles==24.1.0
annotated-types==0.7.0
anyio==4.10.0
attrs==25.3.0
autogen-agentchat==0.7.2
autogen-core==0.7.2
autogen-ext==0.7.2
beautifulsoup4==4.13.4
certifi==2025.8.3
cffi==1.17.1
charset-normalizer==3.4.2
coloredlogs==15.0.1
cryptography==45.0.6
ddddocr==1.5.6
Deprecated==1.2.18
distro==1.9.0
exceptiongroup==1.3.0
flatbuffers==25.2.10
greenlet==3.2.4
h11==0.16.0
httpcore==1.0.9
httpx==0.28.1
humanfriendly==10.0
idna==3.10
img2pdf==0.6.1
importlib_metadata==8.7.0
jiter==0.10.0
jsonref==1.1.0
lxml==6.0.0
mpmath==1.3.0
numpy==2.2.6
onnxruntime==1.22.1
openai==1.99.3
opencv-python-headless==4.12.0.88
opentelemetry-api==1.36.0
outcome==1.3.0.post0
packaging==25.0
pdfminer.six==20250506
pdfplumber==0.11.7
pikepdf==9.10.2
pillow==11.3.0
playwright==1.54.0
protobuf==5.29.5
pycparser==2.22
pydantic==2.11.7
pydantic_core==2.33.2
pyee==13.0.0
PyMuPDF==1.26.3
pypdfium2==4.30.0
PySocks==1.7.1
pytesseract==0.3.13
python-dotenv==1.1.1
regex==2025.7.34
requests==2.32.4
selenium==4.34.2
sniffio==1.3.1
sortedcontainers==2.4.0
soupsieve==2.7
sympy==1.14.0
tavily-python==0.7.10
tiktoken==0.10.0
tqdm==4.67.1
trio==0.30.0
trio-websocket==0.12.2
typing-inspection==0.4.1
typing_extensions==4.14.1
undetected-chromedriver==3.5.5
urllib3==2.5.0
webdriver-manager==4.0.2
websocket-client==1.8.0
websockets==15.0.1
wrapt==1.17.2
wsproto==1.2.0
zipp==3.23.0

指令1: (如果需要) 安装兼容的Python版本 (以Python 3.11为例)

如果你的系统已经有python3.11,可以跳过此步

sudo apt update
sudo apt install python3.11 python3.11-venv

指令2: 创建一个名为 .venv 的虚拟环境

python3.11 -m venv .venv

指令3: 激活(进入)这个虚拟环境

source .venv/bin/activate

指令4: (推荐) 升级环境中的pip工具

pip install –upgrade pip

指令5: 安装项目所需的所有依赖库

pip install -r requirements.txt

指令6:运行脚本

python soccer_analyst_v3.py

大模型微调利器LLaMA-Factory深度解析:一个集成可视化训练、多模型适配、高效PEFT算法与端到端评估的语言模型微调框架。

分享我的Colab文件:

https://colab.research.google.com/drive/1XIi1E_L0dod2CoJIz9QVEYCjQKTKAuhT?usp=sharing

把它另存到你的本地Colab笔记本(详细步骤见2025-08-11文章)

点击左侧上传你的数据集文件.json格式。

一定要修改第二个单元格代码filepath = ” “(你上传的数据集的名称)

免费 T4 申请教程:https://zhuanlan.zhihu.com/p/642542618

点击Run all一键运行所有代码格

点击Running on public URL的链接: https://b1b7e1e391675e8e31.gradio.live

GitHub提供文档有详细介绍:https://github.com/hiyouga/LLaMA-Factory/blob/main/README_zh.md

提供的视频非常详细,一看就会。

LangExtract第二期代码文件

可加V:adoresever

请先在.env文件中设置好 OPENAI_API_KEY
1.extract_tool.py :
“””
通用信息提取工具
使用方法: python extract_tool.py <配置名称> <输入文件>
“””

import langextract as lx
import os
import sys
import argparse
from datetime import datetime
from pathlib import Path
from dotenv import load_dotenv
from collections import Counter

# 导入配置
from config import EXTRACTION_CONFIGS

# 自动加载 .env 文件,同时加载 OPENAI_API_KEY 和 LANGEXTRACT_API_KEY
load_dotenv()

def process_document(config_name, input_file):
“””
根据配置处理文件 (已整合所有成功秘诀)
“””
# — 1. 配置和文件检查 —
if config_name not in EXTRACTION_CONFIGS:
print(f”❌ 错误: 未找到配置 ‘{config_name}'”)
sys.exit(1)

if not Path(input_file).exists():
print(f”❌ 错误: 文件不存在 ‘{input_file}'”)
sys.exit(1)

config = EXTRACTION_CONFIGS[config_name]

print(“-” * 50)
print(f”📁 处理文件: {input_file} | ⚙️ 配置: {config_name}”)
print(f”📝 任务描述: {config.get(‘description’, ‘无描述’)}”)

with open(input_file, ‘r’, encoding=’utf-8′) as f:
text = f.read()
print(f”📄 文件长度: {len(text):,} 字符”)

# — 2. 构建提取参数 —
model_id = config.get(“model”, “gpt-4o-mini”)

extract_params = {
“text_or_documents”: text,
“prompt_description”: config[“prompt”],
“examples”: config[“examples”],
“model_id”: model_id,
“extraction_passes”: config.get(“extraction_passes”, 1),
“max_workers”: config.get(“max_workers”, 10),
“max_char_buffer”: config.get(“max_char_buffer”, 2000)
}

# — 3. 针对不同模型应用特殊配置 (核心秘诀) —
if ‘gpt’ in model_id.lower():
print(f”🔧 检测到 OpenAI 模型 ({model_id}),应用特殊配置…”)
from langextract.inference import OpenAILanguageModel

api_key = os.environ.get(“OPENAI_API_KEY”)
if not api_key:
print(“\n❌ 致命错误: 未在 .env 文件中找到 ‘OPENAI_API_KEY’。”)
print(” 请在 .env 文件中添加一行: OPENAI_API_KEY=sk-…”)
sys.exit(1)

extract_params.update({
“language_model_type”: OpenAILanguageModel,
“api_key”: api_key,
“fence_output”: True,
“use_schema_constraints”: False
})
else:
# 默认使用 Gemini 或其他模型,langextract 会自动寻找 LANGEXTRACT_API_KEY
print(f”🔧 使用默认或 Gemini 模型 ({model_id}) 配置…”)
api_key = os.environ.get(“LANGEXTRACT_API_KEY”)
if not api_key:
print(f”\n❌ 致命错误: 未找到适用于 ‘{model_id}’ 的 API 密钥。”)
print(” 请在 .env 文件中添加: LANGEXTRACT_API_KEY=…”)
sys.exit(1)

# — 4. 执行提取 —
print(“🚀 开始提取,请耐心等待…”)
result = lx.extract(**extract_params)

if not result.extractions:
print(“\n⚠️ 警告:本次运行未能提取到任何实体。”)
print(” 请检查: 1. Prompt和示例是否清晰。 2. API密钥和账户额度。 3. 源文件内容是否匹配任务。”)
return

# — 5. 保存和可视化 (使用最新、正确的方式) —
output_dir = Path(“extraction_results”)
output_dir.mkdir(exist_ok=True)
timestamp = datetime.now().strftime(“%Y%m%d_%H%M%S”)
output_base_name = f”{config_name}_{Path(input_file).stem}_{timestamp}”

jsonl_path = output_dir / f”{output_base_name}.jsonl”
lx.io.save_annotated_documents([result], output_name=str(jsonl_path.name), output_dir=str(output_dir))

html_path = output_dir / f”{output_base_name}.html”
html_content = lx.visualize(str(jsonl_path))
with open(html_path, “w”, encoding=”utf-8″) as f:
f.write(html_content)

print(“\n✅ 提取完成!”)
print(f” • 数据文件: {jsonl_path}”)
print(f” • 可视化报告: {html_path}”)

# — 6. 结果统计 —
class_counts = Counter(e.extraction_class for e in result.extractions)
print(“\n📊 提取统计:”)
print(f” 总实体数: {len(result.extractions)}”)
for class_name, count in sorted(class_counts.items()):
print(f” – {class_name}: {count} 个”)

def main():
parser = argparse.ArgumentParser(description=”通用信息提取工具 (最终增强版)”)
parser.add_argument(“config_name”, help=”配置名称 (如 medical, fable 等)”)
parser.add_argument(“input_file”, help=”输入文件路径”)
args = parser.parse_args()
process_document(args.config_name, args.input_file)

if __name__ == “__main__”:
main()


2.config.py :
“””
信息提取配置文件
在这里定义不同类型文档的提取规则
“””

import langextract as lx

# 提取配置字典
EXTRACTION_CONFIGS = {

# ========== 医疗记录配置 ==========
“medical”: {
“description”: “提取医疗记录中的药物、诊断和治疗信息”,
“model”: “gpt-4o-mini”, # 可选: gpt-4o, gpt-4, gpt-3.5-turbo
“extraction_passes”: 2, # 多轮提取提高准确率
“max_workers”: 10,
“max_char_buffer”: 1500,
“prompt”: “””
提取以下医疗信息:
1. 药物名称、剂量、用药频率、用药途径
2. 诊断结果
3. 症状描述
4. 治疗方案
使用原文精确提取,不要改写或总结。
为每个实体提供相关属性。
“””,
“examples”: [
lx.data.ExampleData(
text=”患者主诉头痛3天,诊断为偏头痛。处方:布洛芬400mg,口服,每日3次,饭后服用。”,
extractions=[
lx.data.Extraction(
extraction_class=”症状”,
extraction_text=”头痛3天”,
attributes={“持续时间”: “3天”}
),
lx.data.Extraction(
extraction_class=”诊断”,
extraction_text=”偏头痛”,
attributes={“类型”: “神经系统疾病”}
),
lx.data.Extraction(
extraction_class=”药物”,
extraction_text=”布洛芬”,
attributes={
“剂量”: “400mg”,
“途径”: “口服”,
“频率”: “每日3次”,
“注意事项”: “饭后服用”
}
),
]
)
]
},

# ========== 合同文件配置 ==========
“contract”: {
“description”: “提取合同中的关键条款和信息”,
“model”: “gpt-4o-mini”, # 合同一般比较规范,可以用便宜的模型
“extraction_passes”: 1,
“max_workers”: 5,
“max_char_buffer”: 2000,
“prompt”: “””
提取合同中的以下信息:
1. 甲方和乙方信息(公司名称、代表人)
2. 合同金额和支付条款
3. 合同期限和重要日期
4. 主要权利和义务
5. 违约条款
保持原文的准确性,提取完整条款。
“””,
“examples”: [
lx.data.ExampleData(
text=”甲方:北京科技有限公司(法定代表人:张明),乙方:上海贸易有限公司,合同总金额:人民币100万元整,合同期限:2024年1月1日至2024年12月31日。”,
extractions=[
lx.data.Extraction(
extraction_class=”甲方”,
extraction_text=”北京科技有限公司”,
attributes={“法定代表人”: “张明”}
),
lx.data.Extraction(
extraction_class=”乙方”,
extraction_text=”上海贸易有限公司”,
attributes={}
),
lx.data.Extraction(
extraction_class=”金额”,
extraction_text=”人民币100万元整”,
attributes={“币种”: “人民币”, “数额”: “100万元”}
),
lx.data.Extraction(
extraction_class=”期限”,
extraction_text=”2024年1月1日至2024年12月31日”,
attributes={“开始日期”: “2024年1月1日”, “结束日期”: “2024年12月31日”}
),
]
)
]
},

# ========== 新闻文章配置 ==========
“news”: {
“description”: “提取新闻文章的关键要素”,
“model”: “gpt-4o-mini”,
“extraction_passes”: 1,
“max_workers”: 15,
“max_char_buffer”: 2500,
“prompt”: “””
提取新闻文章中的:
1. 人物(姓名、职位、所属机构)
2. 地点
3. 时间
4. 事件(发生了什么)
5. 引用的言论
标注每个事件的重要性(高/中/低)。
“””,
“examples”: [
lx.data.ExampleData(
text=”昨天下午,苹果公司CEO库克在加州总部宣布,公司将投资50亿美元开发AI技术。他表示:’这是苹果历史上最重要的战略转型。'”,
extractions=[
lx.data.Extraction(
extraction_class=”时间”,
extraction_text=”昨天下午”,
attributes={“精确度”: “相对时间”}
),
lx.data.Extraction(
extraction_class=”人物”,
extraction_text=”库克”,
attributes={“职位”: “CEO”, “公司”: “苹果公司”}
),
lx.data.Extraction(
extraction_class=”地点”,
extraction_text=”加州总部”,
attributes={“类型”: “公司总部”}
),
lx.data.Extraction(
extraction_class=”事件”,
extraction_text=”投资50亿美元开发AI技术”,
attributes={“重要性”: “高”, “金额”: “50亿美元”, “领域”: “AI技术”}
),
lx.data.Extraction(
extraction_class=”言论”,
extraction_text=”这是苹果历史上最重要的战略转型”,
attributes={“发言人”: “库克”, “态度”: “积极”}
),
]
)
]
},

# ========== 学术论文配置 ==========
“academic”: {
“description”: “提取学术论文的关键信息”,
“model”: “gpt-4o-mini”,
“extraction_passes”: 2,
“max_workers”: 10,
“max_char_buffer”: 3000,
“prompt”: “””
提取学术论文中的:
1. 研究问题和假设
2. 研究方法
3. 主要发现和结论
4. 引用的重要文献
5. 数据和统计结果
保持学术术语的准确性。
“””,
“examples”: [
lx.data.ExampleData(
text=”本研究采用随机对照试验(RCT)方法,样本量n=500,结果显示治疗组相比对照组症状改善率提高了35% (p<0.001)。",
extractions=[
lx.data.Extraction(
extraction_class=”方法”,
extraction_text=”随机对照试验(RCT)”,
attributes={“类型”: “实验研究”}
),
lx.data.Extraction(
extraction_class=”样本”,
extraction_text=”n=500″,
attributes={“样本量”: “500”}
),
lx.data.Extraction(
extraction_class=”结果”,
extraction_text=”症状改善率提高了35%”,
attributes={“改善幅度”: “35%”, “统计显著性”: “p<0.001"}
),
]
)
]
},

# ========== 客户反馈配置 ==========
“feedback”: {
“description”: “提取客户反馈中的情感和问题”,
“model”: “gpt-3.5-turbo”,
“extraction_passes”: 1,
“max_workers”: 20,
“max_char_buffer”: 1000,
“prompt”: “””
提取客户反馈中的:
1. 情感倾向(正面/负面/中性)
2. 产品或服务名称
3. 具体问题或建议
4. 客户需求
为每个提取内容标注情感强度(1-5分)。
“””,
“examples”: [
lx.data.ExampleData(
text=”你们的客服态度太差了!我打了3次电话都没解决问题,产品质量倒是不错,就是售后服务需要改进。”,
extractions=[
lx.data.Extraction(
extraction_class=”负面情感”,
extraction_text=”客服态度太差了”,
attributes={“对象”: “客服”, “强度”: “5”}
),
lx.data.Extraction(
extraction_class=”问题”,
extraction_text=”打了3次电话都没解决问题”,
attributes={“频次”: “3次”, “状态”: “未解决”}
),
lx.data.Extraction(
extraction_class=”正面情感”,
extraction_text=”产品质量倒是不错”,
attributes={“对象”: “产品质量”, “强度”: “3”}
),
lx.data.Extraction(
extraction_class=”建议”,
extraction_text=”售后服务需要改进”,
attributes={“改进点”: “售后服务”}
),
]
)
]
},

# ========== 文学作品配置 ==========
“literary”: {
“description”: “提取文学作品(如小说、诗歌、戏剧)中的核心元素”,
“model”: “gpt-4o-mini”, # 文学分析需要更强的理解能力
“extraction_passes”: 2, # 多轮提取以捕捉深层含义
“max_workers”: 10,
“max_char_buffer”: 3000,
“prompt”: “””
提取文学作品中的以下要素:
1. 主要人物 (姓名、角色、性格特点)
2. 场景和氛围 (地点、时间、环境描述、情感基调)
3. 关键情节 (发生了什么,转折点)
4. 主题思想 (作品探讨的核心议题,如爱、死亡、成长、社会批判等)
5. 象征或意象 (具有特殊含义的物品或概念,如“红灯笼”象征压抑)
6. 修辞手法 (如比喻、拟人、排比等)
请精确引用原文,并为每个提取项提供相关属性。
“””,
“examples”: [
lx.data.ExampleData(
text=”我冒着严寒,回到相隔二千余里,别了二十余年的故乡去。时候既然是深冬,渐近故乡时,天气又阴晦了,冷风吹进船舱中,呜呜的响,从篷隙向外一望,苍黄的天底下,远近横着几个萧索的荒村,没有一些活气。”,
extractions=[
lx.data.Extraction(
extraction_class=”关键情节”,
extraction_text=”回到…故乡去”,
attributes={“事件类型”: “返乡”, “人物”: “我”}
),
lx.data.Extraction(
extraction_class=”场景”,
extraction_text=”相隔二千余里,别了二十余年的故乡”,
attributes={“地点”: “故乡”, “时间跨度”: “二十余年”, “距离”: “二千余里”}
),
lx.data.Extraction(
extraction_class=”氛围”,
extraction_text=”萧索的荒村,没有一些活气”,
attributes={“情感基调”: “荒凉、衰败”, “天气”: “严寒, 阴晦”}
),
lx.data.Extraction(
extraction_class=”意象”,
extraction_text=”苍黄的天”,
attributes={“色彩”: “苍黄”, “暗示”: “压抑、沉闷”}
),
lx.data.Extraction(
extraction_class=”修辞手法”,
extraction_text=”冷风吹进船舱中,呜呜的响”,
attributes={“类型”: “拟声/拟人”, “对象”: “冷风”}
),
]
)
]
},
}

# ========== 添加你自己的配置 ==========
# 复制上面的模板,修改为你需要的提取规则
# “your_config”: {
# “description”: “你的配置描述”,
# “model”: “gpt-4o-mini”,
# “prompt”: “你的提取指令…”,
# “examples”: […]
# }

详细教程:用Unsloth快速微调OpenAI首个开源大模型gpt-oss!低配显卡也能拥有专属GPT

分享我的Colab文件:

https://colab.research.google.com/drive/11jEpOECqYKEWh_75Bc3hSw2CmWqE4oF3?usp=sharing

点开链接会进入Colab界面,在这所做的修改不会保存,需要将它复制保存到Drive中。

上传文件

在这个单元格data_files=填入你的数据集名称;如果是别的数据集格式需要修改代码

修改微调细节:

最后一个单元格是测试微调效果,在原项目上是没有的,如果不需要可以直接删除:

如果使用T4 GPU会有概率超出可使用显存,导致失败;推荐选择L4 GPU性价比最高;A100 GPU速度更快,收费更高,具体看你需求。

点击Restart session and run all即可一键运行:

时序知识图谱测试解析

创建虚拟环境: python -m venv tkg_agent_env
激活虚拟环境: source tkg_agent_env/bin/activate
克隆代码库 git clone https://github.com/openai/openai-cookbook.git


进入项目目录: cd openai-cookbook/examples/partners/temporal_agents_with_knowledge_graphs/
安装Jupyter Lab: pip install jupyterlab
启动Jupyter Lab服务: jupyter lab


作用: 本地启动Web服务器,在浏览器打开Jupyter Lab操作界面,与项目文件进行交互。

双击打开temporal_agents_with_konwledge_graphs.ipynb文件

点击“双箭头”图标,重启内核并一键运行所有单元格

等待输出结果

需要OpenAI的API key调用模型分块、问答

分块时如遇到API速率上限可选择更换模型,需自己手动添加

后续没有问题就会生成图谱

可在单元格修改问题测试问答

在作者Huggingface上也有上传的已经处理好的数据集,代码可以直接下载调用

关于过程步骤,整个文件有详细的英文说明。